Star Wars Jedi Survivor Path of Conviction is one of the three required puzzles that you’ll have to complete to unlock and access the Wayfinder’s Tomb on the Jedha Planet and obtain the Treasures Locations Display Map Upgrade.
To complete the Path of Conviction Puzzle, it is mandatory to unlock the Upgraded Ascension Cable during the Pursue Rayvis main objective in your second visit to Shattered Moon.
The Path of Conviction Puzzle requires the speed of a Podracer and the precision of a Jedi Knight, so buckle up for a challenge.
As such, in the following Star Wars Jedi Survivor guide, we will explain where to find the Path of Conviction and its collectibles and how to solve the puzzle in the area to receive your reward.
Where To Find The Path Of Conviction Puzzle On Jedha
Path of Conviction can be reached through the Arid Flats area of the Jedha Planet, as marked in the image below.
You can fast-travel to Arid Flats Meditation Point or Desert Ridge Meditation Point, jump on a Spamel (the giant mount), and follow the path through the desert to the Path of Conviction.

Now, let’s see how to solve the Path of Conviction puzzle and grab all the collectibles along the way.
How To Solve The Path Of Conviction Puzzle
While facing the Path of Conviction ruins, look to your left to find two floating machines you can grapple with using the Upgraded Ascension Cable.
Grab onto the first one and jump onto the second one, then aim to the left side of the cliff terrace.
Deal with the troopers around the cliff terrace, then check the small alcove to your right. At the bottom, you’ll see two droids guarding the Path of Conviction Chest containing Weapon Material – Wood.
After you collect the Chest, find a grappling hook on the left, use your Ascension Cable by pressing  /
/ , and climb to the top.
In the middle of this new area, you will find the Path of Conviction Databank entry at the top of some short stairs.
To reach the lower level on the opposite side of the mesa, which contains the puzzle, use the vertical zipline located to the left of the databank collectible.

But before you drop down the vertical zipline, go to the opposite side of the shortcut, jump down below, and use Force Push ( /
/ ) to break the golden pot containing the Path of Conviction Treasure collectible.
After you go down the vertical zipline, grapple onto the flying machine by pressing / and jump onto the right platform. Check the image below to learn the exact location.

Let’s start by explaining how the Path of Conviction puzzle works. On these ruins’ walls are four ball roll slides with only three balls.
Please note that the numbers on the image above are meant to label the roll slides, not to indicate the order in which you should perform steps or actions.
Our goal is to complete the construction of roll slide #3 from start to finish, ensuring that the ball can roll from the bottom left corner all the way to the top without any obstructions or interruptions.
While solving this puzzle, it’s important to note that specific actions or activities have only a temporary effect. In order to get the job done, we need to perform the following steps marked in the image below quickly.

To begin, pull the ball located in roll slide #1 (step 1). This action will cause the left side of horizontal roll slide #3 to lower and align with the lower horizontal roll slide #2.
Afterward, quickly grab onto the floating machine and land on the left platform (step 2), then push the ball in roll slide #2 towards the right (step 3). Check the image below for a visual reference.
This has to be done very quickly before the ball in roll slide #1 returns to its initial place.
By doing so, a stone platform adjacent to roll slide #4 will appear, allowing you to access roll slide #4.
Pushing the ball on roll slide #4 allows you to connect the upper section of roll slide #3.
Now, return to the platform with roll slide #1 and prepare yourself for a challenge.
In the image below, we’ve marked all the steps you must follow to align all the pieces and push the ball on roll slide #3 all the way to the top. Also, we will provide you with clear explanations for each step and its corresponding outcome.
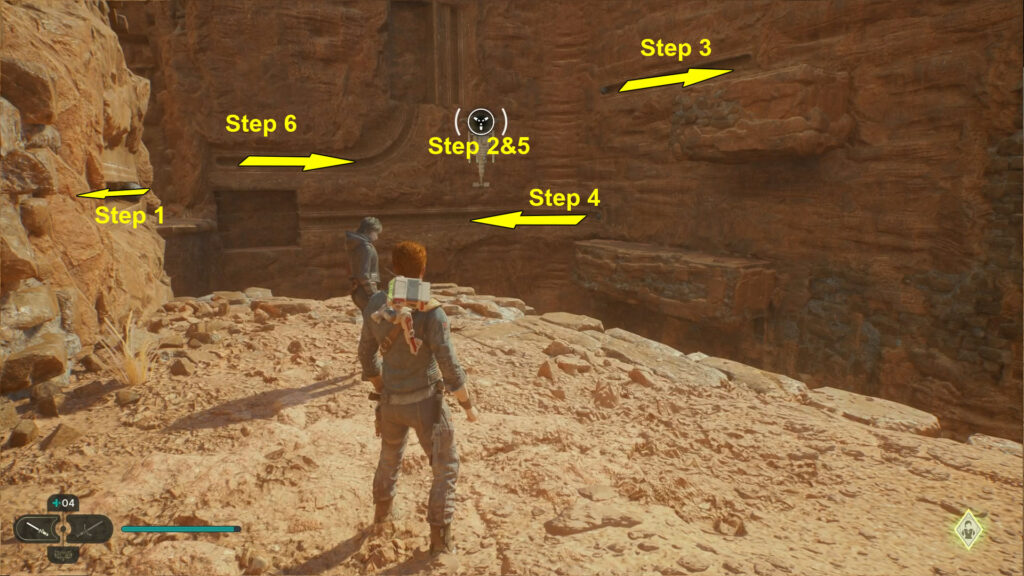
Let’s start by pulling the ball in roll slide #1 (step 1), grapple onto the flying machine, and land on the newly created platform (step 2), then pull the ball in roll slide #4 (step 3).
After that, quickly drop down on the platform below and push the ball in roll slide #2 (step 4), then grapple again on the flying machine and land on the platform to your right (step 5).
Finally, once you’ve landed, push the ball in roll slide #3 all the way to the top (step 6).
As we mentioned earlier, you’ll have to be very swift when performing all the above steps, which can be frustrating if you are a casual player.
Also, if you messed up after step 4 and didn’t manage to push the ball in time during step 6, you’ll have to redo all the previous three steps from the beginning and try again.

That’s it! Congratulations on successfully finishing the Path of Conviction Puzzle in Star Wars Jedi Survivor. Don’t forget to check our Wiki Hub Page here for more puzzles and collectibles guides.
