Star Wars Jedi Survivor Foothill Falls is a small area you can reach from Rambler’s Reach Outpost, and it features twelve collectibles, including four Chests.
The Foothill Falls Chests contain customization items and a permanent increase in the number of Stims you can carry.
Also, considering that the Chests are collectibles, we’re sure that all the completionists out there will not want to miss them.
However, the SW Jedi Survivor Foothill Falls Chests are not on the main path, and to make sure you’ll get them all, you should follow our locations guide below.
Koboh Foothill Falls Chests Locations Map
On the following map of Foothill Falls, we’ve pinpointed all four Chests in the area.

Of course, if you already have the Chests Map Upgrade, you can see the collectibles on your own map.
On top of that, we’ll provide additional instructions for each collectible in the same order as on the map above.
Chest #1 (Slicked Back Hair): Behind A Small Building
To start, head to Rambler’s Reach Outpost Meditation Point and then go to the front door of Pyloon’s Saloon in the settlement.
Facing the door, turn left to see an orange slope you must use to head up, and when you reach a crossroad, take the path to the right.
To find the first Star Wars Jedi Survivor Chest in Foothill Falls, take the zip line up and go behind the small building to the right.

Chest #2 (Patience Pommel): In The Water
Upon obtaining the previous collectible, dive into the water next to the big entrance to the mountain.
You should see the Chest collectible on the bottom to the right, like in the next screenshot.

Chest #3 (Droid Paint Weapon Materials): Next To A Relter
Now get out of the water and get on the other side of the chasm with the help of the Relter (big bird) by the edge on the right side.
Then go down the first slope to the left (right near the edge) to find a Nekko in a cave.
Mount the Nekko, go back up the slope, and continue forward by the edge to reach the mountain wall.
You should be able to spot a portion of the wall you can run on by double jumping to it with the help of the Nekko.
To continue, you’ll need the Upgraded Ascension Cable you can obtain by progressing with the main story.
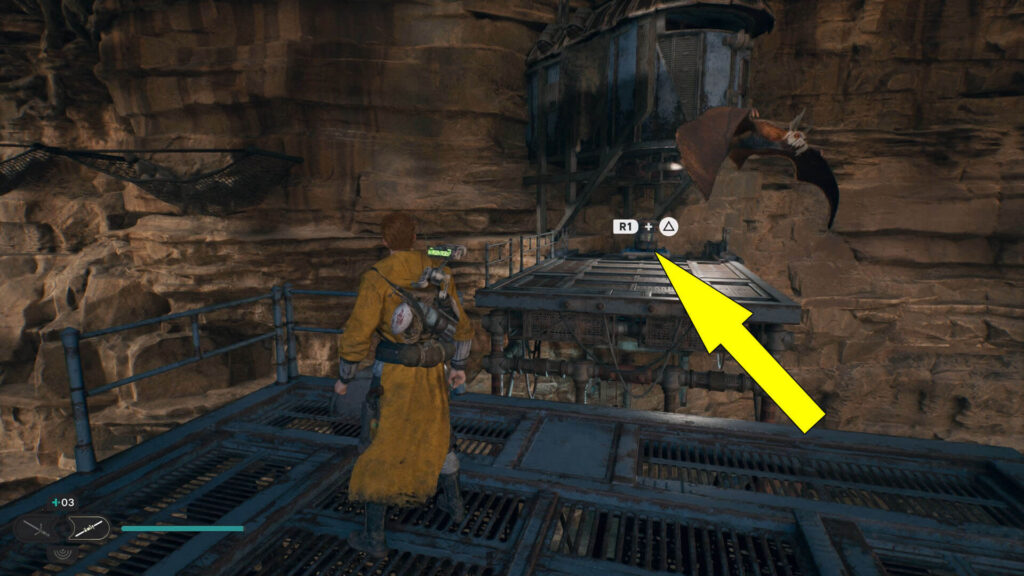
After wall running and getting on the cliff, look up to the left to see a flying machine you can grapple to by jumping and holding  /
/ on your PlayStation/Xbox controller.
Now aim at the platform to the right, the one with the Relter, and let go of / to jump to it.
You can see the next Star Wars Jedi Survivor Foothill Falls Chest next to the Relter, and to open it, you must use Force Lift ( +
+ /
/ +
+ ), then Force Slam (+
 /+
/+ ).
).
The Force Lift and Slam abilities also get unlocked by progressing with the main story.
Chest #4 (Max Stims Increase): Next To Some Shelves
Once you’ve obtained Chest #3, jump to the next platform (at the same level) and drop to yet another platform under you.
Then go to the device with the red light on the edge of the cliff and Slice it with BD-1 to spawn a Roller Mine.
Next, you must make the Roller Mine follow you to the platform, then use Force Pull (hold /) on the droid, aim at the hole in the building under you, and use Force Push (press  /
/ ) to create an opening inside.

Finally, jump on the roof of the building, drop through the hole, and head into the newly accessible room to find the last collectible next to some shelves.

Well done, Jedi! You’ve collected all four Star Wars Jedi Survivor Foothill Falls Chests, and you can now focus on the four Databanks in the same area or head to our Wiki Hub Page here for other collectibles and puzzles.
