Starfield Display of Power is the second mission in the Strikers questline you can complete when exploring Neon City, and unlike the previous side mission, it involves fewer dialogue choices.
Display of Power mission in Starfield, however, allows you to continue helping Briggs by letting the people know that the Strikers gang is back.
To do this, you must hack three signs scattered around the city. Some of them are guarded by the Disciples, while one of them is under the direct supervision of a Security Guard.
Regardless, the Display of Power signs must be hacked to progress the associated questline and unlock the next mission in line; therefore, in the following walkthrough, I’ll tell you how to tackle this side mission in the latest video game developed by Bethesda Game Studios.
How To Start the Starfield Display of Power Mission
To be able to play the Display of Power mission in Starfield, first, you must complete the previous assignment for Briggs, so feel free to check The Audition walkthrough if you need help finding the Strikers.
Once you finish The Audition, you’ll automatically start the Display of Power mission while visiting Madame Sauvage’s Place. At this point, Briggs asks you to talk to Hatchet, the female NPC next to him.

When you talk to Hatchet, she’ll tell you that Andrea Sandoval thought Briggs wanted you dead, so he sent you to deal with the Disciples.
Answer by choosing She can join the long line of people wishing me harm, then ask her about your next task.
Hatchet wants to inform the people that the Stirkers are back by hacking three signs indicating their turf. She also outlines that Briggs wants a low body count, so make sure you agree. Before heading outside to look for the signs, it’s worth knowing that you can approach the Disciples however you see fit.
Remember that while Briggs may pose as a peaceful gang leader, he still hates the Disciples. Furthermore, your companions don’t really care about the Disciples, so they are not interested if you spill their blood or not.
So, head outside Madame Sauvage’s Place, and let’s see where to find the three signs you need to hack.
Starfield Display of Power Signs Locations
After you exit Madame Sauvage’s Place while tracking the current mission, you’ll see three objective markers for the three signs you’ll need to hack. Since there is no specific order to hack the signs, let’s move from one sign to another.
Second Hacking Sign Location: On the Other Side of a Bridge
From Madame Sauvage’s Place, head right, take a left turn and follow the stairs leading to the upper floor. Take the elevator on the right side to Underbelly, then cross the bridge ahead.
On the other side of the bridge, you’ll see a gray box and, behind it, the control panel, which allows you to hack the second sign.
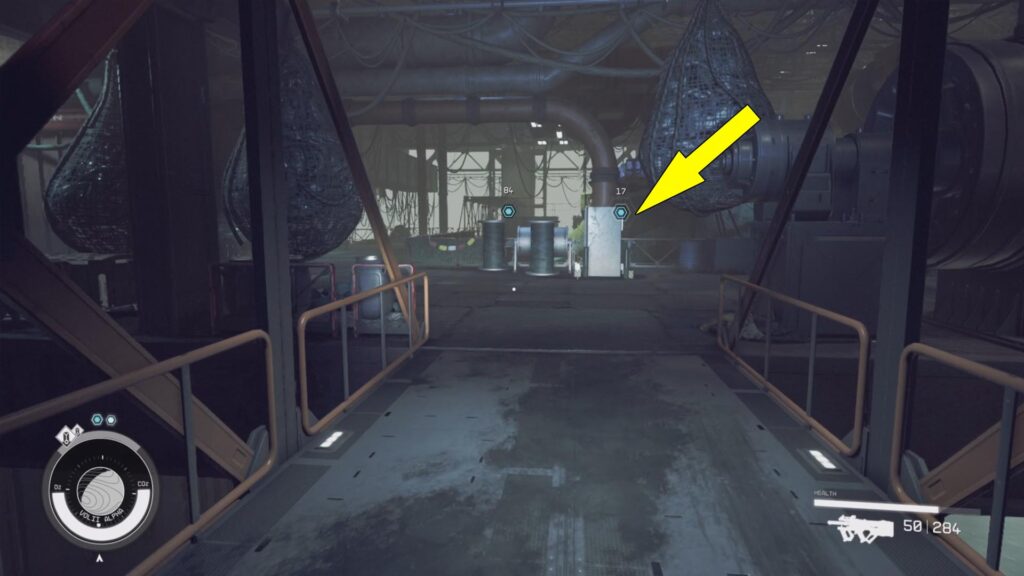
Before approaching the sign, be advised that a Neon Security Guard is nearby. If you want to avoid being spotted, you’ll need a camo suit; however, you can also deal with him peacefully. But it will cost you.
Assuming you get caught, you have the option to Persuade him to let you go, but you’ll need a high Persuasion Skill.
The Security Guard is fairly hard to convince that you are not doing anything wrong, mainly because, as you probably noticed, most Neon City citizens have a hard life. So, it is recommended to pay the guard since Credits is what he wants, as Sarah outlines.
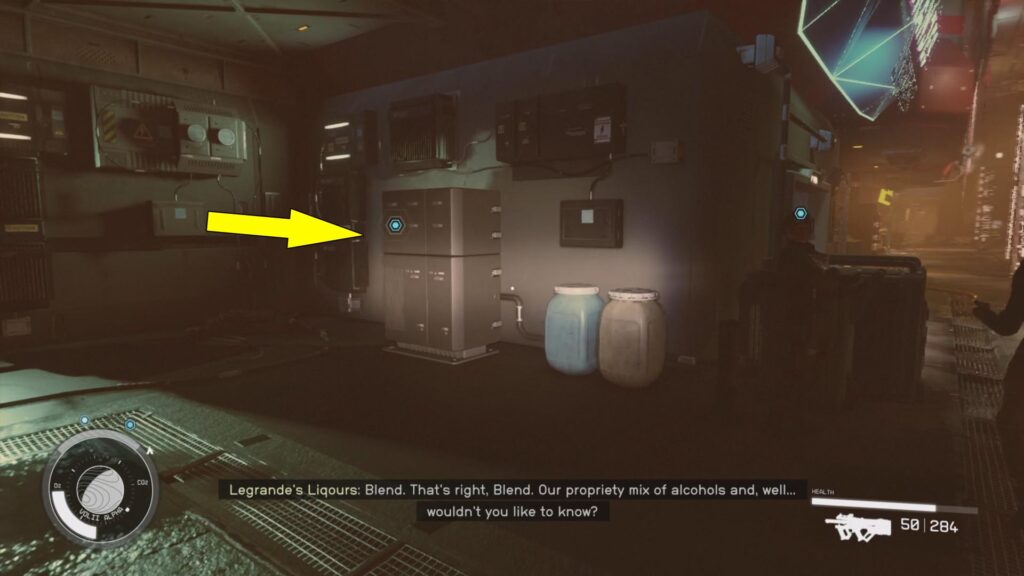
Third Sign Location: Near Legrande’s Liquors Store
From the Second Sign, head right and cross the next bridge. Take the elevator to the Upper Platform, then head left until you see the Euphorika Building on the left side. In front of the building is a door leading to Bayu Plaza.
When you get to the other side, head right and continue following the main street to Legrande’s Liquors store on the right side.
You may remember this store from the Loose Ends side mission. Look around the corner to spot the third Sign Control Node you must hack.
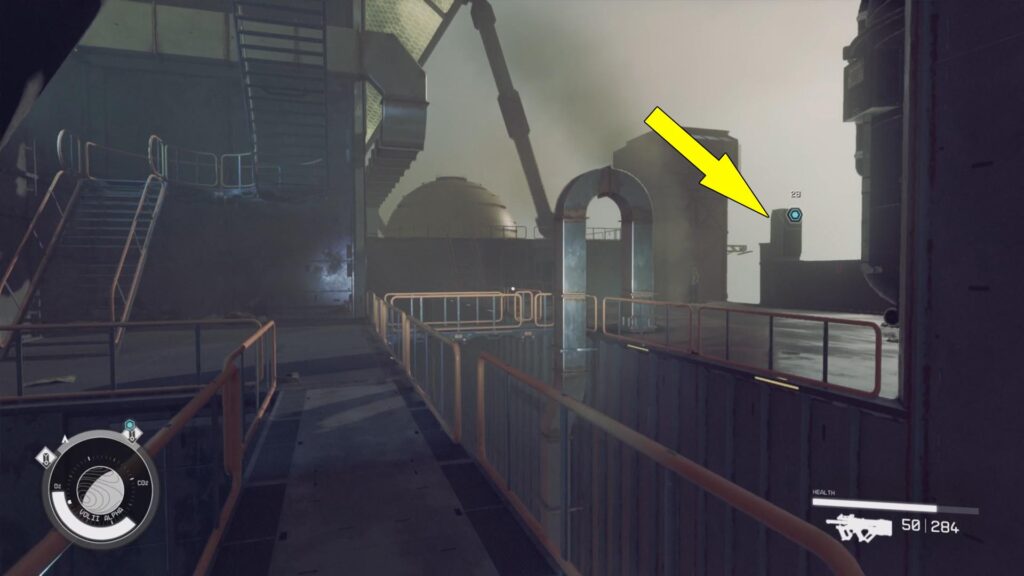
First Hack Sign Location: On the Rooftops
Great job! Now for the last sign, head left from your current location, then go through the door leading to Ebbisde. You should see it near the Trade Authority building on the left side.
Follow the stairs ahead of you and take a right turn along the balcony. Keep moving all the way to the other side of the balcony, and on the right side, you’ll find some stairs leading to the rooftops. Here, you’ll need to follow the stairs all the way to the top, then head left and cross the platforms.
Be advised that when you get close, you’ll need to deal with some Disciples. How you do this is not important for the current mission, meaning you can shoot all of them if that’s what you want.
After you clear the area, you’ll see the last box waiting for you on the roof.
Once you are done with the last sign, it’s time to report back to Briggs. So, descend the stairs and return to Madame Sauvage’s Place following the objective marker on your screen and the path highlighted on the ground when you press LB on your Xbox controller.
When you talk to Briggs, he’ll inform you that the Strikers are getting ready to deal with the Disciples once and for all. He’ll want you to prepare for the last mission, which may involve hurting innocent people.
Make sure you tell him that you will not hurt innocent people to boost your relationship with Sarah; then Briggs tells you that he wants you to visit Newill’s and acquire some armor for the Strikers.
Tell him that you’ll do what you can, and the Starfield Display of Power mission ends, but now you’ll start the next one named The Showdown.
