Immortals Fenyx Rising
Immortals Fenyx Rising Mounts: How To Get Indika The Blue Unicorn
In Immortals Fenyx Rising Indika also counts as one of the 25 Mounts you can find while playing the video game developed by Ubisoft. Additionally, Indika is the second mount you should tame the moment you reach the second area in the game (Valley of Eternal Spring).
Or the first mount if you missed Tyrian, because she’s rather easy to find and is a level 3 mount.
Although she can’t fly; Indika just like Tyrian has 3 rows of stamina, which places her amongst the best mounts early in the game.
So if you’re looking to ride a blue unicorn, then Indika is the one you need; and in the Immortals Fenyx Rising guide below I’ll tell you where to find this unique mount, how to tame her, and obviously how to summon her whenever you need to move faster.
Where To Find Indika In Immortals Fenyx Rising
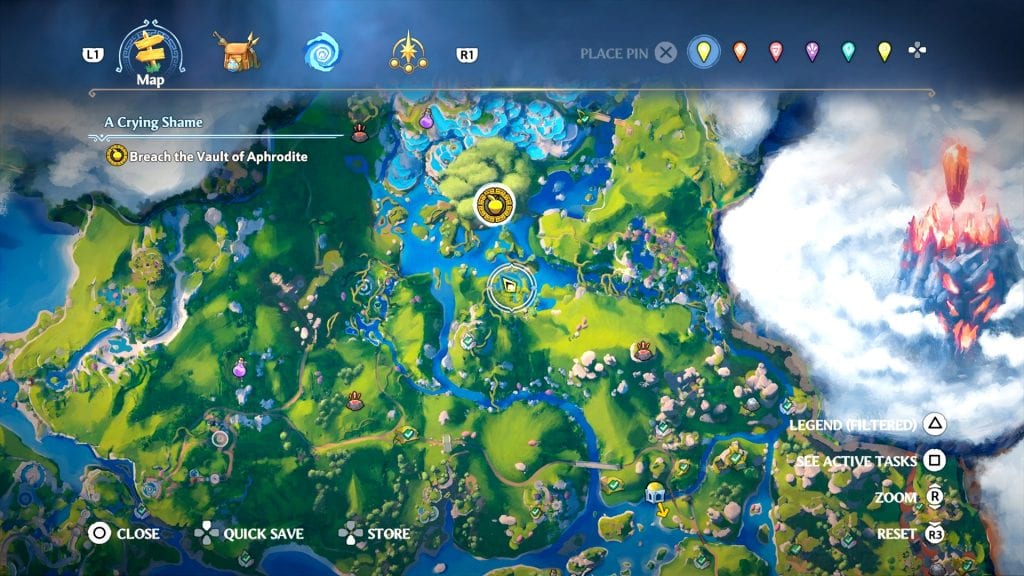
Ok, so let’s start with the location of this Immortals Fenyx Rising mount, which as said is Valley of Eternal Spring.
As you can see on my map below, she is found in a swampy area south of Gaia’s Soul.
Use my location’s icon to find it, simply because the mounts can’t be marked by scanning an area.
How To Tame Indika The Immortals Fenyx Rising Mount
After you reach the location marked on my map; look around to spot the beautiful steed.
Notice that she’s patrolling around the statue in my screenshot.

Get close to Indika but don’t make sudden moves
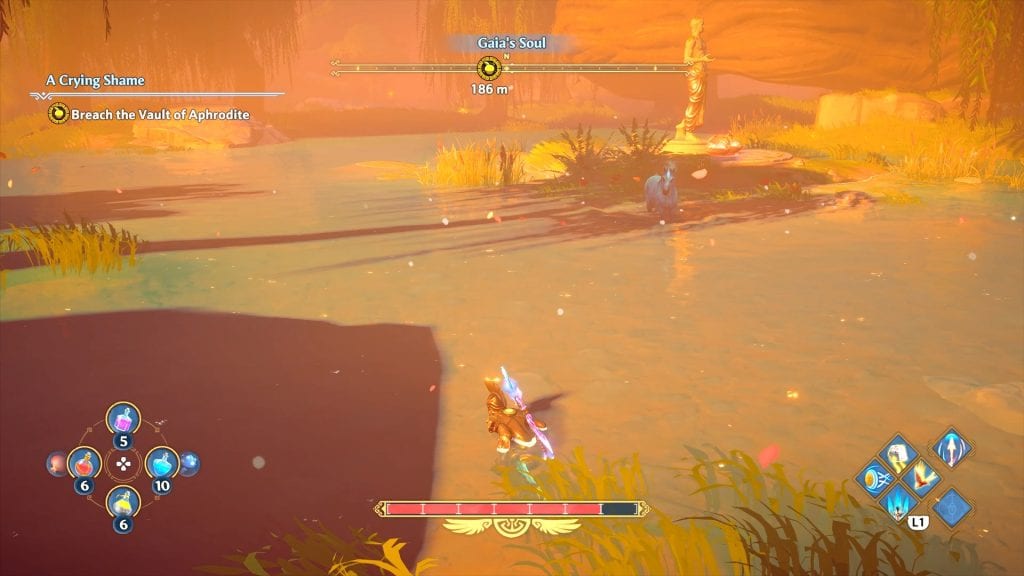
Now, without getting too close, observe the path she follows.
Use the bushes nearby to approach her.
In order to catch or tame an Immortals Fenyx Rising Mount; your goal is to stay hidden and get near the mount without scaring it.
If by any chance you are spotted, Indika starts pounding the ground and a red exclamation mark appears. If this happens stop and do not move.
You can continue to approach the mount once she is calm and the said exclamation mark disappears.
Move slowly and when you are close enough press the corresponding button on your screen (△ on PlayStation 4 and PlayStation 5).
Now, the mount belongs to you.
How To Call/Summon Indika
Summoning Indika in Immortals Fenyx Rising is actually very easy. All you have to do is to press △ (PlayStation 4 & 5) and the mount (or in this case Indika) appears under Fenyx.
Additionally, if you want to change your mount in the game you can do that via the inventory.

The beautiful Indika
Open the game’s menu, select Inventory, then the Mounts slot above Fenyx’s pouch. Equip the mount you want to use, and you’re done.
That’s where you find and tame Indika; one of the Immortals Fenyx Rising Mounts, but keep in mind that in Valley of Eternal Spring you can also get: Sepia, Anemone, Cypress, Bolt, and Alabaster.
Immortals Fenyx Rising
Immortals Fenyx Rising: How To Complete Helping The Anemoi Vault Of Tartaros
Helping The Anemoi is an Immortals Fenyx Rising Vault of Tartaros that tests your timing abilities in the video game developed by Ubisoft. This Vault can be found in the Valley of Eternal Spring area and can be accessed quite early in the game.
Helping The Anemoi Immortals Fenyx Rising Vault Of Tartaros is all about understanding how several plates work and the objects they activate. Once you do that, this Vault will be a walk in the park.
So, before we begin our guide let’s see some details about the Valley of Eternal Spring Helping The Anemoi Vault.
Helping The Anemoi Location & Details
As you can see on my map above this Vault of Tartaros is located on the southeastern side of the Valley of Eternal Spring. You’ll find it southeast of the Hall Of The Gods.
Here is what you should know about it.
- Difficulty:1/3
- Area: Valley of Eternal Spring
- Objectives: 2
- Chest(s): 1
- Zeus’s Lightning: 1
- Other Tartaros Vaults Nearby: Adonis’s Fall, Arena Of Fortitude
Immortals Fenyx Rising Helping The Anemoi Walkthrough
Once you enter the Vault, the first puzzle is pretty easy to complete.
Simply activate the switch in front of you, then step on the plate on the left side.
Now, watch the sphere that spawns how it moves through the small labyrinth and reaches the slot on the other side.

Wait for the sphere to reach the slot
Pretty easy right? Good, so now head towards the crystal, then turn left and use the airstreams nearby to reach the upper section.
Here you’ll find a checkpoint and the second puzzle.
Helping The Anemoi Second Puzzle Solution
To solve this puzzle, first get close to the switch and while facing it, notice the two plates. One is on the right and one on the left.
The idea here is to move from one plate to another in a specific order while keeping your eyes on the sphere that is about to spawn.
Basically, you need to help the sphere reach its slot by removing all obstacles in front of it.
The plate on the right activates/deactivates all red barriers while the one on the left moves a section of the wall creating a bridge for the sphere.
So, the order of the plates is: right, left, right; but keep in mind that you are not allowed to step off the plates until the sphere passes through the sections with the obstacles.
Good then, so activate the switch, then step on the right side plate. Once the ball gets on the other side of the barrier; move to the left side plate and wait until it passes over the broken wall.
Now, head back to the first plate and don’t move until the sphere gets into its slot. Like this.

Keep your eyes on the ball
Good so now use the airstreams to move forward towards the next area, where the last puzzle takes place.
Again you’ll see a checkpoint, but this time there are two switches and two plates.
Just so you know, here you’ll also find the Vault Chest. But first, let’s solve the last puzzle.
How To Solve The Last Puzzle In Helping The Anemoi Vault
As you are about to see this puzzle is split into two sections. Each section comes with a sphere and there are two spheres you’ll have to guide to their slots.
Again the plates nearby activate/deactivate specific elements.
The one on the left activates/deactivates barriers, while the one on the right is connected to a series of platforms you can move up and down.
As such, activate the left switch then step on the left plate. Wait for the sphere to pass the barrier, then step on the right plate.
Now once the ball passes the column you just moved, get back to the left plate. Once it exits the small room below, step off the plate to stop the ball from falling into space.

Make sure you stop the ball from falling outside the area
The second part of the puzzle is similar, except that you’ll need to move faster.
So, activate the switch on the right, then step on the platform on the left. Wait for the ball to go through all 3 gates, then quickly move to the plate on the right to raise a column.
Now head back to the plate on the left and stay there until the ball falls into the slot.

The sphere must be placed in the upper slot
Good so now the path towards the exit is clear, but before exiting this Vault you’ll have to get the hidden chest.
Where To Find The Helping The Anemoi Vault Chest
As you can see in my picture above the chest is in the area with the final puzzle.
From the spot between the plates you can glide to the other side, and then just go around the barriers to get it.

Get the hidden chest
You don’t have to activate any switches to get this one and inside you’ll find the Bristled Pelt.
Now, head to the upper section of the puzzle and glide back to the main area.
Finally, glide over the airstreams to reach the final chest with Zeus’s Lightning and the exit.
That’s how you complete all the Immortals Fenyx Rising Helping The Anemoi Vault Of Tartaros objectives.
Immortals Fenyx Rising
Immortals Fenyx Rising: How To Complete Arena Of Heroism Vault Of Tartaros
Immortals Fenyx Rising Arena Of Heroism is another combat-focused Vault of Tartaros you’ll have to complete in the video game developed by Ubisoft, and is almost identical to Arena Of Fortitude we already covered.
The Arena Of Heroism Immortals Fenyx Rising Vault Of Tartaros is found in Valley of Eternal Spring, and the only difference between this challenge and the one mentioned above are the enemies you’ll have to deal with.
Simply put, this specific Vault is a bit harder than Arena Of Fortitude because its difficulty level is 2; however, even the Vault Chest is in the same spot.
So, before we begin our walkthrough let’s see some details about the Valley of Eternal Spring Arena Of Heroism Vault.
Arena Of Heroism Location & Details
As you can see on my map above this Vault of Tartaros is located east of the Palace of Aphrodite and north of Eros’s Heaven.
Here is what you should know about this Vault.
- Difficulty:2/3
- Area: Valley of Eternal Spring
- Objectives: 2
- Chest(s): 1 – Contains 1 Molten Fragment
- Zeus’s Lightning: 1
- Other Tartaros Vaults Nearby: The Path To Erebos, The Messenger’s Path
Immortals Fenyx Rising Arena Of Heroism Walkthrough
To complete this Vault your first goal is to deal with enemies at the entrance.
After you dispatch them, jump into the red rift.
Once inside, head to the door in front of you and pull the lever next to it.
Now you’ll enter a very large arena, like the one in my screenshot below.

Same arena, different enemies
If you pay close attention you can spot 3 crystals on the other side of the arena.
In order to progress, you’ll have to light them up so you can open the door.
Every crystal is connected to a wave of enemies you’ll have to deal with.
So we have 3 crystals which means that you’ll have to defeat three waves of enemies.
Without going into details, the first wave includes several harpies. The second one includes more harpies and two gorgons; while the third one features two heavy soldiers and even more harpies.
By defeating them, you’ll unlock the gate in front of you; however, before moving forward you’ll also want to find the Vault Chest.
Where To Find The Arena Of Heroism Vault Chest
As we already know from the previous arena, the Vault Chest is unlocked by defeating a fourth wave that spawns, after you pull the lever on the left side while facing the exit.
This time when you activate the lever, a Gryphon will spawn.
Defeating this mythical creature is mandatory in order to collect the hidden Vault Chest.
After you deal with it, simply look for some airstreams close to the lever (pictured below).

Don’t forget to claim the hidden Vault Chest
Use them to glide up to the platform where the chest is waiting for you.
Inside you’ll find a lot of crystals and a Molten Fragment.
Now it’s time to retrace your steps back to the arena and follow the door you opened earlier.
Simply glide on the airstreams in front of you and on the upper platform you’ll find the chest containing Zeus’s Lightning and the exit.
That’s how you complete all the Immortals Fenyx Rising Arena Of Heroism Vault Of Tartaros objectives.