Tiny Tina’s Wonderlands Tangledrift Lucky Dice are mandatory for reaching 100% progress or completion in the Flowering Tower area from Gearbox Software’s video game. Tangledrift Lucky Die collectibles, like all other Die Chests we have found, provide extra loot and XP; thus, you should focus on finding all of them when you get to this area.
Where To Find the Tangledrift Dice Chests
For our guide to be as helpful as possible, let’s start with the Tangledrift Lucky Chest locations map, which pinpoints all collectibles in this region. As you can see, these are scattered all around the region known as Flowering Tower, but some of them are in small areas you can unlock by playing side-quests.

Therefore, it is recommended that you start looking for the Tangledrift Dice after you complete all four side-quests in the region so you can enter all sub-areas. Prioritize A Small Favor, Burning Hunger, and Ron Rivote side-quests.
After you finish these side-quests, it’s time to mop up all Die Chests in Tangledrift, following the same order as the one on the map above. Obviously, you can do this while also looking for other Tangledrift collectibles.
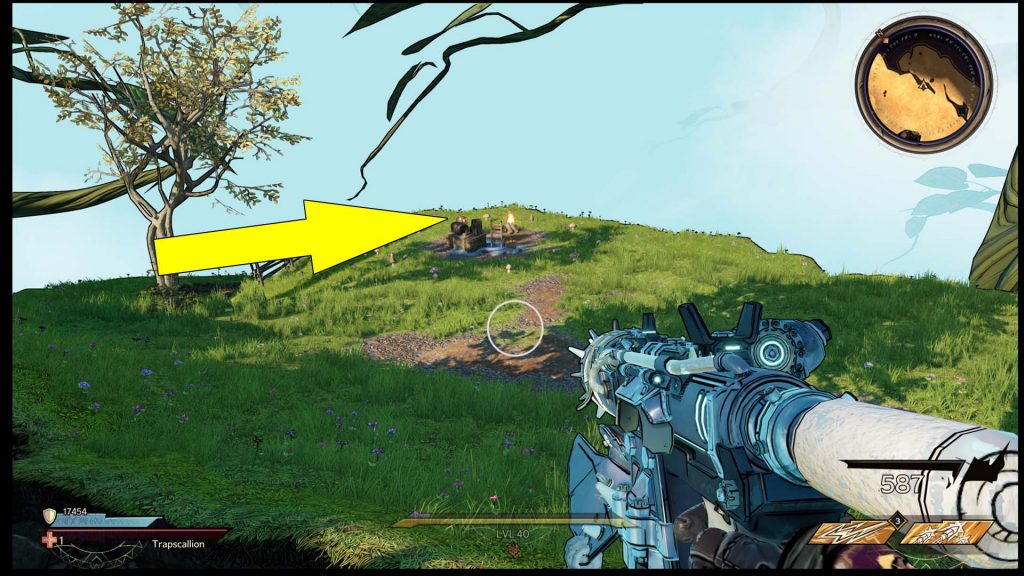
Lucky Die #1: On a Plateau
Upon entering Tangledrift, use the first stalk to slide down, and you’ll get to the area known as Beanageddon. After dealing with the mobs in the clearing, you’ll see the first Lucky Die on the map above, sitting on a hill (or plateau) next to a house. You can get to it by jumping on the purple plants.

Lucky Die #2: On a Haystack
The second Tangledrift Lucky Die is easier to spot being outside, near the previous one. Look for it in the area known as What’s Left of Driftwood, on top of a haystack near a house. Close to it is a New-U station.

Lucky Die #3: Behind a Store
Several steps away from the previous Lucky Chest is the third one. It sits on a porch in the back of Ye Old Gift Shop, as you can see in my screenshot.

Lucky Die #4: Next to a Tower
The next Tiny Tina’s Wonderlands Tangledrift Chest is also relatively easy to spot. Look for it near a large stone tower, across the path from the vending machines and the What’s Left of Driftwood fast travel point.

Lucky Die #5: On a Balcony
After you get the previous collectible, head south and use the three red mushrooms to get to the floating island where the fifth Lucky Die appears on my map above. Head up the first stalk, and on the right side, you’ll see a house and a Chest on its balcony. To get it, you’ll have to use the wooden platform (marked below) and reach the roof. Now, drop on the balcony.

Lucky Die #6: Behind a House
For the next Lucky Die collectible in Tangledrift, head east from the previous one and look for three red mushrooms. Jump on them, and you’ll get to the next area named Chains of The Elder. To get to the Die on my map above, you’ll have to finish the Burning Hunger side-quest. After you free the Elder Wyvern, look for the collectible behind a house at the island’s edge.

Lucky Die #7: On a Suspended Platform
Once you get the previous Die Chest, use the red mushrooms to return to the previously suspended island (where you found the fifth) and head towards the upper structures to get to the Last Light area. Clear the mushrooms in the area, then look for a suspended platform or island on the southern side. You can reach its top by jumping on the yellow flowers.

Lucky Die #8: On the Porch of a House
To get to the next Die in Tangledrift, head towards the broken tower after the previous collectible and start ascending. As you climb, you’ll eventually reach a large vine similar to a slide. Go up, but pay close attention to the right side to spot a red mushroom you can jump on to get to the houses in the distance. After landing, look on the first porch to get the next Chest.

Lucky Die #9: Inside a House
After the previous Die, go around the houses and jump on the red mushroom to get back to the tower. Climb it, then follow the path south, moving from one suspended platform to another. Eventually, you’ll get to the area known as Murder Church. There are multiple Lucky Die Chests here. The first one you should approach is the one inside a house marked on my map above.
It’s pretty easy to find, but you’ll need to play the Ron Rivote side quest to open the said house. You can see it behind a counter.

Lucky Die #10: Near a Broken Cart
Now that you helped Ron Rivote return to the Murder Church area, and pay attention to the hill on the left side as you enter because you’ll see another Lucky Die near a cart. To get this one, go around the hill and climb the platforms below the mausoleum.
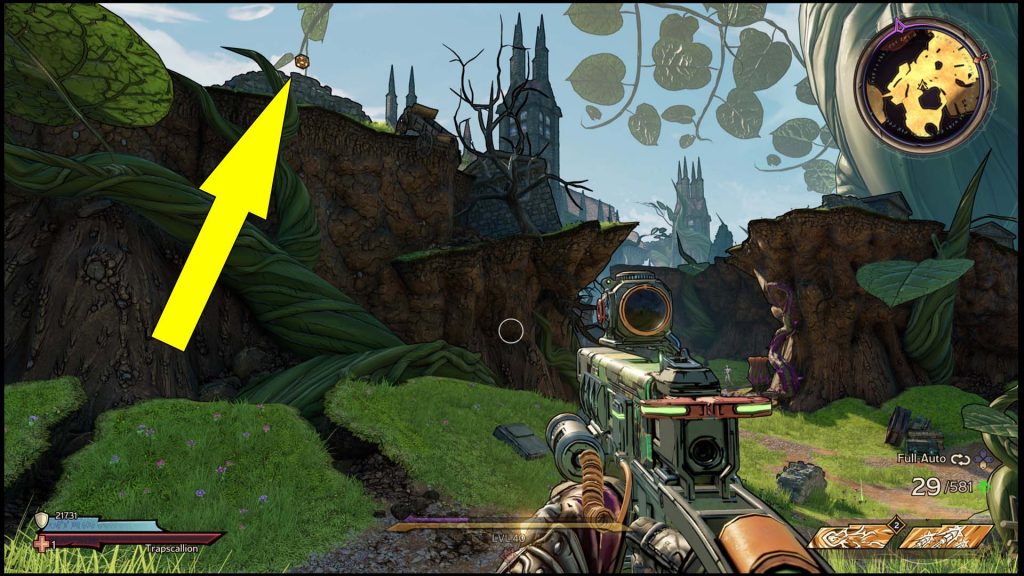
Lucky Die #11: Behind an Invisible Wall
Immediately after entering the Murder Church, head left, and you’ll see some stairs leading to a basement. At the end of the stairs is an invisible wall you can smash to find the 11th Die on my map above.

Lucky Die #12: In a Room on the Second Floor of the Church
After clearing the main room in Murder Church, while facing the large altar (flower), head left, and you’ll see a stalk with some smaller yellow flowers. Jump on them to get to the second floor, then on the balconies above the main room. One of them grants access to a small room where the next Lucky Die awaits.

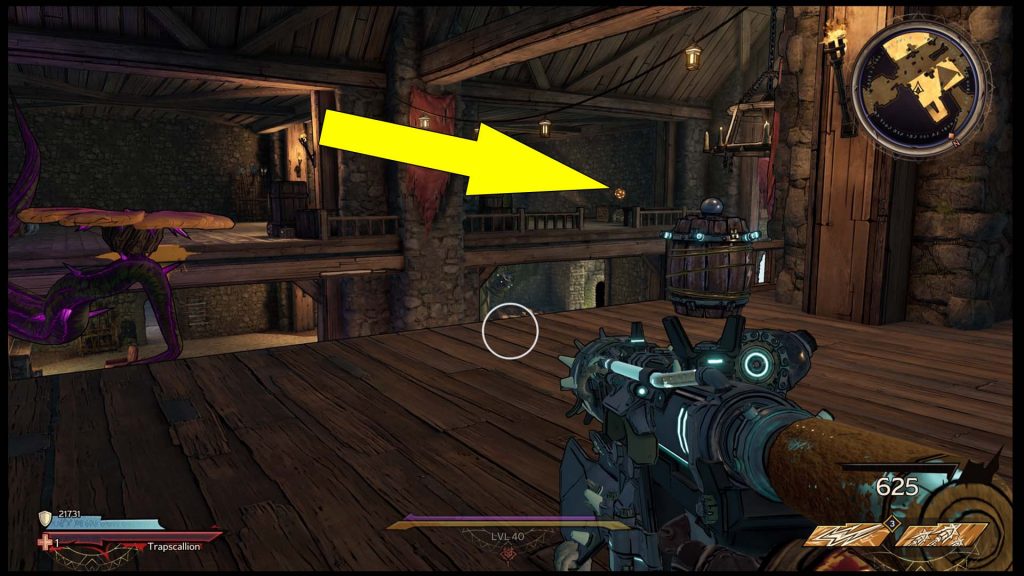
Lucky Die #13: In a Chimney
After you get the previous Die, head to the church’s second floor via the small door on the right side of the altar (large flower). Here, you’ll find some vending machines where you can restock. Now, you’ll have to slide down a large stalk; however, get ready to jump on the right side. You should see some wooden planks. Land on them, then follow the path around the exterior wall and through a broken window to get the Lucky Chest in the chimney below.
NOTE: If you miss the jump, use the Tangledrift – Murder Church fast travel point and retry.

Lucky Die #14: On Top of a Wall
Upon reaching the Upper Keep area, first clear the courtyard. Now, turn left, and you’ll see one of the Tangledrift Lucky Die Chests on the upper wall. Follow the stairs on the right side to collect it.

Lucky Die #15: On a Bean Stalk
As you cross the first courtyard, head towards the next tower, and you’ll have to cross a stalk that acts as a bridge. When you reach the other side, look to the left, and below, you’ll see another Lucky Die on a patch of land. Be careful because there is an air vent that can push you away.

Lucky Die #16: Behind an Invisible Wall
For the next Die, you’ll have to enter the Keep. Start by clearing the central courtyard, then head inside. Eventually, you’ll find a New-U station, and while looking at it, on the right side, you’ll see an air vent. In front of the air vent is a fake wall you can smash to find the 16th hidden Tangledrift Lucky Chest on the map above.

Lucky Die #17: On a Balcony Inside the Keep
Upon clearing the main room inside the Upper Keep, follow the stairs on the right side (north) and get to the second floor. Here, you’ll see a Lucky Die collectible on the balcony on the other side. Jump on the yellow flower to get it.
Lucky Die #18: Behind a Mirror
Retrace your steps back to the previous balcony on the second floor, and on the wall, you’ll see a strange mirror. Go through the mirror, and you’ll be teleported to a cellar where the next Lucky Die is found. Look for it on the right side of the Chest.

Lucky Die #19: Near a Portal
For the next collectible, you’ll have to deal with the Parasite boss. The arena where you’ll fight the Parasite can be accessed from the What’s Left of Driftwood area following the main quest. Once the boss is defeated, enter the portal that appears, and you’ll be teleported to a remote area. Close to another portal on the small island (left side while facing it) is the Die.

Lucky Die #20: On a Table in Zoseph’s House
The 20th Die is in the area known as Ratty Shack. To get here, you’ll have to go through a portal inside a small ruin near the Warsmith in What’s Left of Driftwood. This area is best approached while playing A Small Favor side-quest because the Lucky Die is inside Zoseph’s house.
If you have already finished the quest, there is a small portal that allows you to enter Zoseph’s Manor, and the Lucky Die you’re looking for is on the table. You can get it by jumping on the crate near the table.

Lucky Die #21: Near a Campfire
Finally, after the previous chest defeat Kastor The Normal-Sized Skeleton, to exit the basement and then head towards Avie’s Idyol area on the same island. Here, you’ll find a campfire and, next to it, the last Tangledrift Lucky Die.