Assassin’s Creed Valhalla
Assassin’s Creed Valhalla How To: Find The Suthsexe Treehouse Shoppe Hoard Map Treasure
Assassin’s Creed Valhalla Suthsexe Treehouse Shoppe Hoard Map is one of the Artifacts you can find in Suthsexe.
Just like all Treasure Hoard Maps, it allows you to unlock a hidden treasure in the latest Assassin’s Creed video game developed by Ubisoft.
Claiming the AC Valhalla Suthsexe Treehouse Shoppe Treasure; is a bit harder than most hidden treasures because the map in question comes with a riddle and you can’t find it like the rest.
So, in case you need help, make sure you follow this guide to discover the Suthsexe Treehouse Shoppe Hoard Treasure as I will tell you where it is and what you need to do to get it.
Before we begin though it is worth mentioning that you should not confuse this Hoard Map with the Witch’s House Hoard Map, the Suthsexe Crawelie Hoard Map, or the Suthsexe Hoard Map because they are quite different.
Or simply put in Suthsexe there are 4 Hoard Maps you’ll need to find; so below we will focus exclusively on the Suthsexe Treehouse Shoppe Hoard Map.
Suthsexe Treehouse Shoppe Hoard Map Location
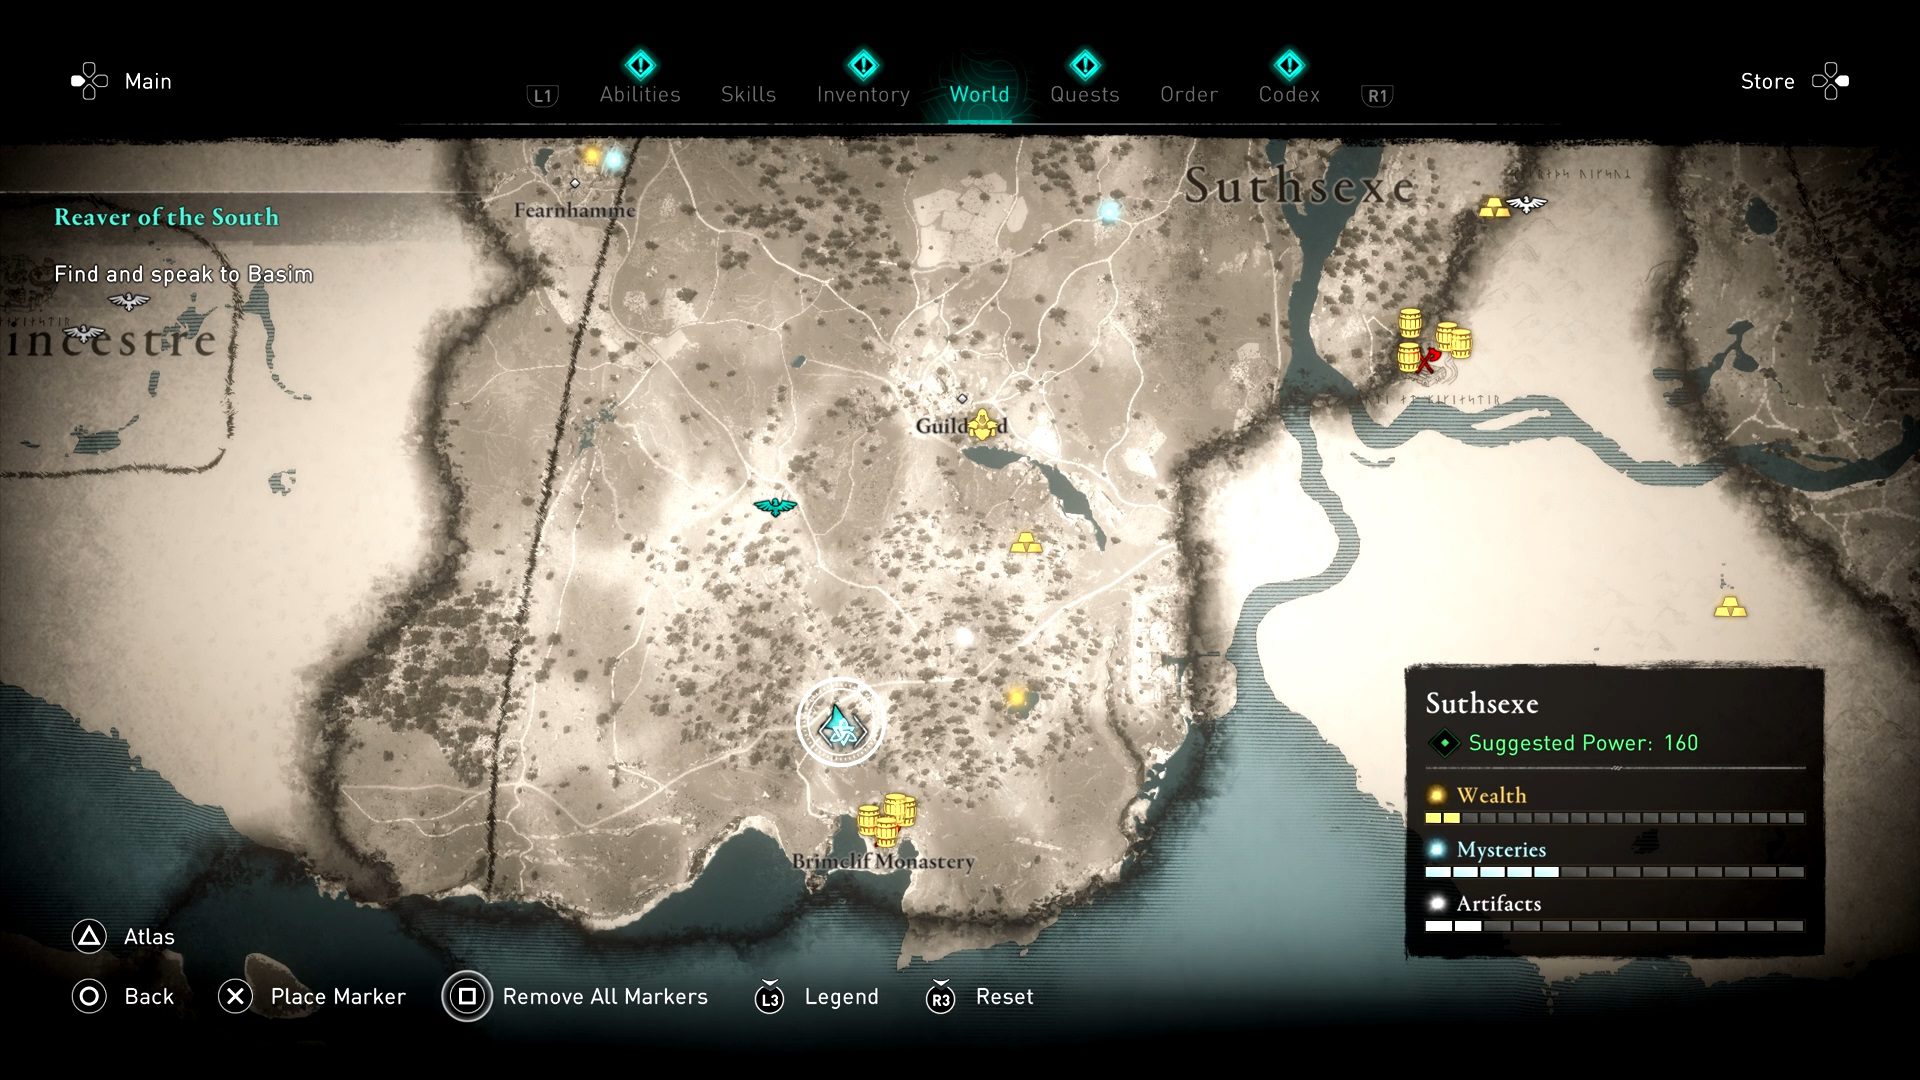
The first step is to locate the actual Treehouse Shoppe Hoard Map in Suthsexe.
As said this map is unlike any other maps in the video game, meaning that in order to get it you’ll need to complete a World Event.
This event is named Tiny Black Market and as you can see on my map below it is located just north of Brimclif Monastery.
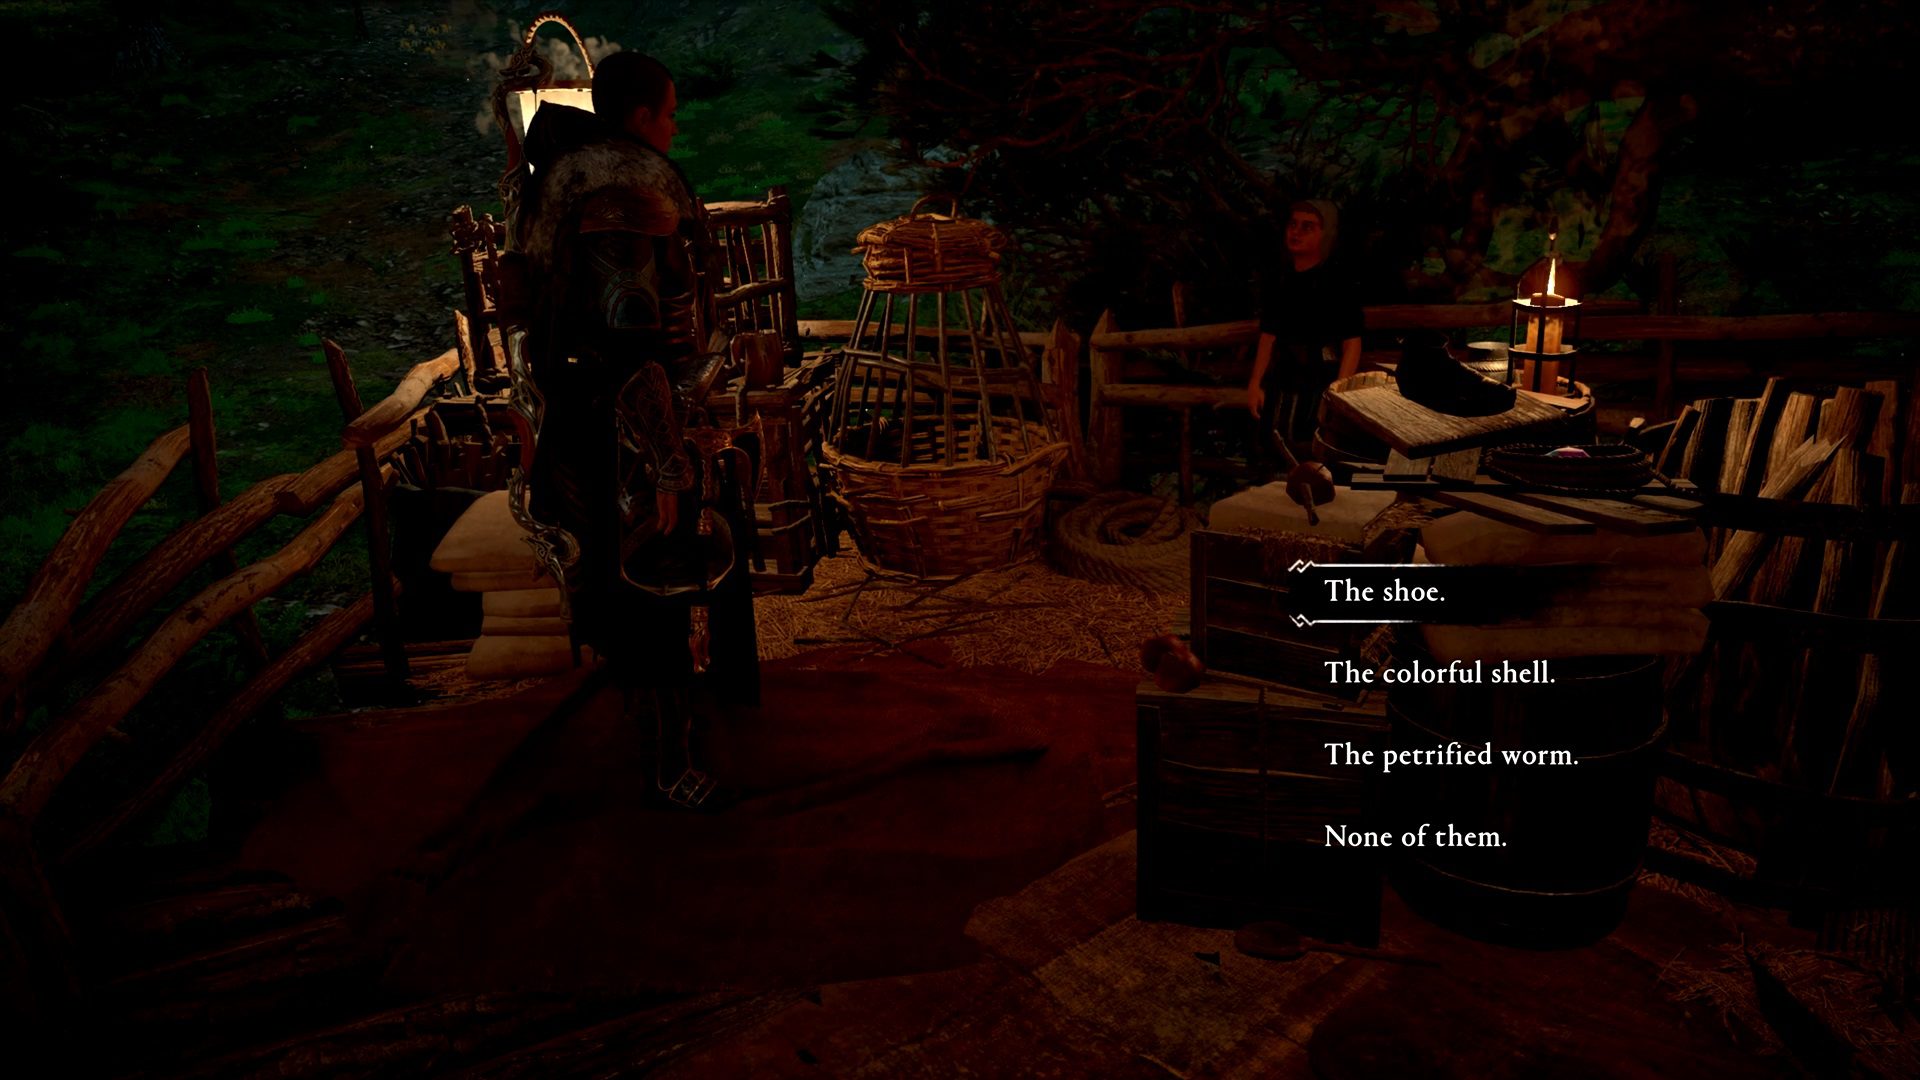
When you get to this location (Treehouse Shop), your goal is to buy a series of items, from a little girl.
To get to the girl, however, first, you’ll need to provide his brother with a password which happens to be Apple.
Now the Treehouse Shop is open for you and you’ll be able to buy three items: a special shoe, a colorful shell, and a petrified worm.
The most important one is the shoe because inside you’ll find the map, but obviously, you may want to buy the rest as well.
Once you buy the shoe you’ll get the map and finish the Tiny Black Market event.
Where To Find The Suthsexe Treehouse Shop Hoard Treasure
Once you pick up the treasure map, open your inventory, and check the riddle which provides several clues:
- The treasure is west of Brimclif
- Past the rock bridge
- It requires a leap of faith
Now, from your current location, open your map and head south towards Brimclif Monastery.
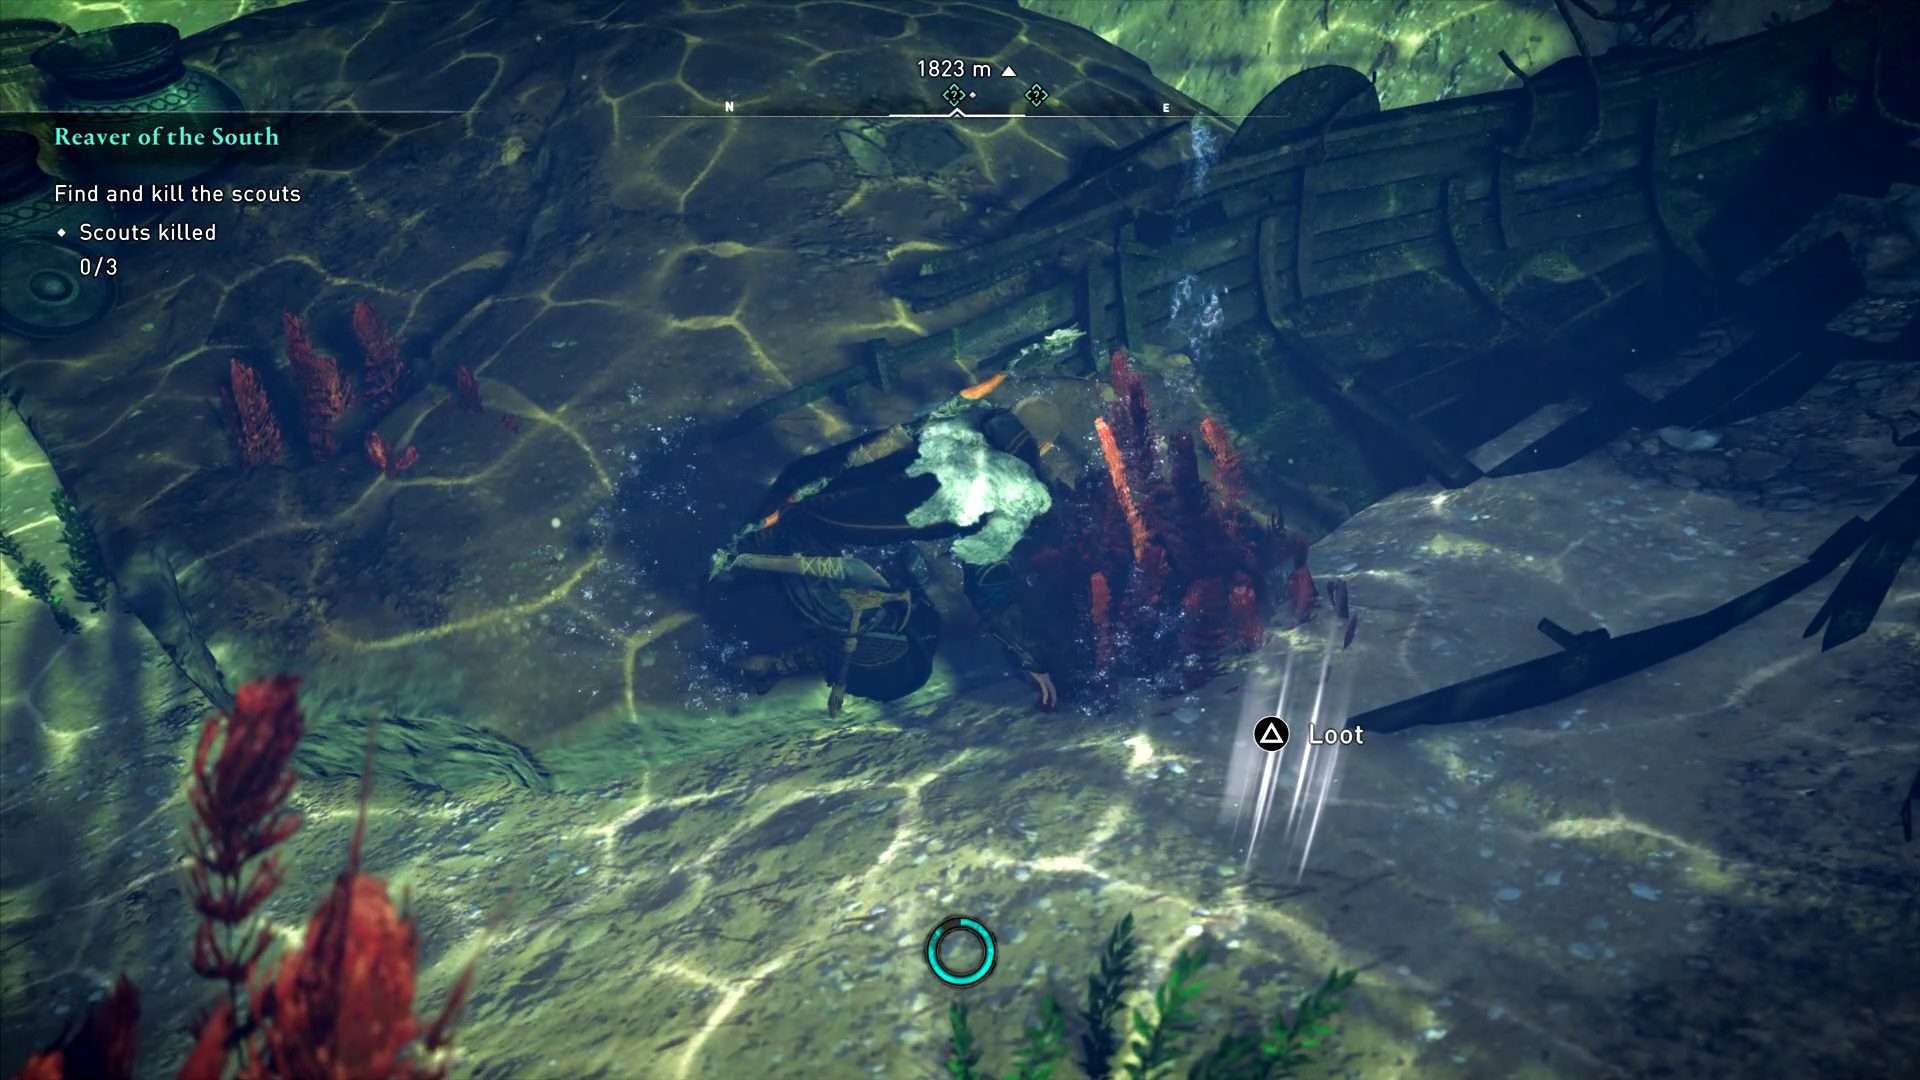
When you get to the spot marked on the map, you’ll see a very large wooden cross at the edge of the cliff.
To get to it, you’ll need to cross a stone bridge mentioned in the riddle.
While standing next to the said cross, perform a leap of faith in the water below.
Now, look around to spot the wreck of a ship like the one in my screenshot.
The treasure you’re looking for is next to the shipwreck.
That’s how you find the hidden Assassin’s Creed Valhalla Suthsexe Treehouse Shop Hoard Treasure.
Assassin’s Creed Valhalla
Assassin’s Creed Valhalla: How To Enter The Mad Monk’s Lair
The Assassin’s Creed Valhalla Mad Monk’s Lair is a key-location you’ll discover while exploring Suthsexe.
This specific landmark featured in the latest Assassin’s Creed video game developed by Ubisoft; is also tied to a Mystery you have to complete, and in the following guide, we’ll discuss both the lair and the Mad Monk you’ll have to deal with.
The Mystery is named A Prayer for Vengence and as usual, this World Event must be completed in order to get 100% completion in Suthsexe.
Once you do that you’ll be able to fully explore the Mad Monk’s Lair.
Where To Find The Mad Monk’s Lair In AC Valhalla
As you can see on my map below, the Monk’s Lair is located southwest of Chertsey Abbey Ruins; however, on the same map you can also see that I have marked the location of the World Event you should complete first.
The idea here is to finish A Prayer for Vengence event, deal with the Mad Monk, and only then explore the Mad Monk’s Lair.
So, first head to the location of the said Mystery and here you’ll find a tomb.
Now you’ll want to find a way inside and since the main entrance is blocked, simply go around the tomb to spot the window in my picture below.
Shoot an arrow through the window and aim for the crate on the other side.
Next, head back to the main entrance and push the shelf to get inside.
While inside the tomb start looting everything. Here is what you can find:
- Monk’s Lair Chest Key – on a piece of cloth on the ground
- Opal – found on the right side next to a drawing on the wall
- To God and The Many Martyrs Note – near the small window mentioned above
- Leather & Ore – inside the chest
- Titanium – next to the pile of wood
Dealing With The Mad Monk
Once you get all these items it’s time to get out of the tomb, except that the Mad Monk who owns the place won’t let you escape.
Your goal here is straightforward. Kill the Mad Monk who is a very accessible target. You can see him below.
After you kill him A Prayer for Vengence ends, so head to the Mad Monk’s Lair on my map above.
Exploring The Mad Monk’s Lair
To get inside the Mad Monk’s Lair you don’t need a key because the door is wide open, so start looking around to find the following items which are the most important:
- Nickel Ingot – by the door (requires the Monk’s Lair Chest Key you already got from the tomb)
- Suthsexe Hoard Map – on the ground in the corner of the house
Once you clear the area, all you have to do is to focus on finding the Suthsexe Hoard Map Treasure we already discussed here.
Assassin’s Creed Valhalla
Assassin’s Creed Valhalla: How To Stop Griseld’s Sacrifice
In Assassin’s Creed Valhalla Griseld is an NPC and a woman you’ll need to save for a Mystery you can complete while exploring Suthsexe.
This specific quest featured in the latest Assassin’s Creed video game developed by Ubisoft; is very short, but in case you need help completing it, the following guide or walkthrough; explains what you have to do.
The Mystery is named Aflanc The Terrible and as usual, this World Event must be completed in order to get 100% completion in Suthsexe.
Your goal is to save Griseld before she is drowned by her father, who goes by the name of Bad Father. The reason is pretty obvious.
By stoping Griseld’s sacrifice you’ll also solve the mystery behind Aflanc The Terrible, who (according to Griseld’s dad) is a satanic sea beast.
Where To Find Griseld & Her Bad Father In AC Valhalla
In order to start this Mystery, first, you’ll want to find Griseld.
As you can see she is located north-east of Guildford and south of Briggworth. This is the location where the mystery starts.
When you get to the spot on my map you’ll find Griseld who is about to be sacrificed by her own father, in order to please Aflanc the satanic sea beast.
This sacrifice should stop the floods Aflanc sent; so the next thing you’ll want to do is to stop this madness and free Griseld.
Once you do that, you’ll find more about Aflanc, Griseld, and the Bad Father who is clearly nuts. And a very rude fellow too.
While talking to them; Griseld’s father will show you that Aflanc is in the lake behind you, so your next goal is to end this nonsense by finding what is going on.
Who Is Aflanc The Terrible
While standing close to Griseld, look at the lake behind her and you’ll see a floating platform.
Jump into the lake and dive all the way down to spot a Viking shipwreck.
Scan the area and you’ll be able to see several items you can loot.
The most important one (or the item you’re looking for) is a Viking Ship Rope like the one pictured below.
Grab it then return to the surface and talk to Griseld. Now, you’ll trigger a very interesting cutscene that should answer all your questions.
The long story short is that Griseld’s father knew that Aflanc is just a story, but he used it in order to get rid of his daughter. So basically he wanted to kill her and use Aflanc as an excuse.
Truly a crazy fellow.
Unfortunately, you won’t be able to apply the justice this guy deserves, but the good thing is that you saved Griseld and her father will never bother anyone again. Hopefully.
That’s how you save Griseld from drowning for the Assassin’s Creed Valhalla Aflanc The Terrible quest; so let’s focus on the Mad Monk next.