Hogwarts Legacy The Helm Of Urtkot is one of the three main quests that unlock after finishing Percival Rackham’s Trial in the game published by Warner Bros. Games, and it allows you to progress the story as a Hogwarts student.
The Helm Of Urtkot quest in Hogwarts Legacy revolves around the Witch’s Tomb; you’ll have to explore looking for a Helmet very important to the Goblins. Like most landmarks, the Hogwarts Legacy Witch’s Tomb features a series of puzzles and some Treasure Chests you don’t want to miss.
Where To Find Sirona in the Helm of Urtkot
As mentioned, The Helm Of Urtkot quest becomes available alongside the Beasts Class story quest and Caretaker’s Lunar Lament main quest once you finish the first trial.
Regardless of which quest you decide to complete first, it’s worth knowing that for the Helm Of Urtkot, you’ll need to unlock the Depulso Spell by finishing Professor Sharp’s Assignment 1 because, without it, you won’t be able to solve some of the puzzles.
Once you finish the Assignment, empty your inventory by selling all the gear you no longer use. Then, open your Field Guide Map, navigate to Hogsmeade Map, and fast-travel to one of the Floo Flames within the village. The first objective of this quest is to find Sirona in the Three Broomsticks. You may remember her from your first visit to Hogsmeade when she saved you from Victor Rookwood and Theophilus Harlow.
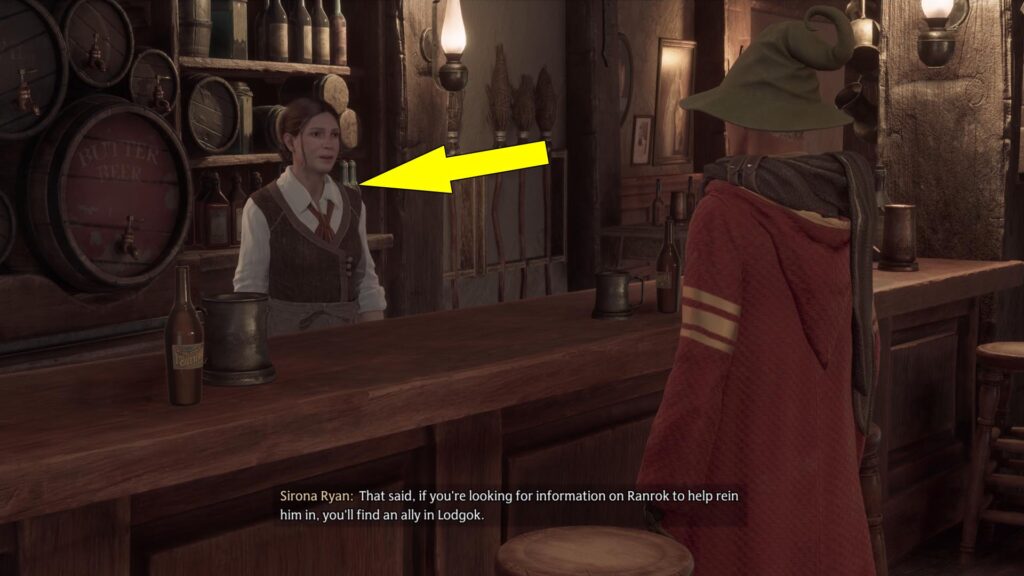
While talking to Syrona Ryan, ask her about Lodgok, the Goblin you also met during the Hogsmeade trip. As a Goblin, Lodgok may know more about Ranrok’s plan, but unfortunately, he left Three Broomsticks. Sirona will tell you to look for him at the Hog’s Head Inn.
Where To Find Lodgok at the Hog’s Head Inn
To find Lodgok at the Hog’s Head Inn, make sure you track the current quest in your Field Guide, then open your map, and you should see the location of Hog’s Head Inn on the southeastern side of Hogsmeade.
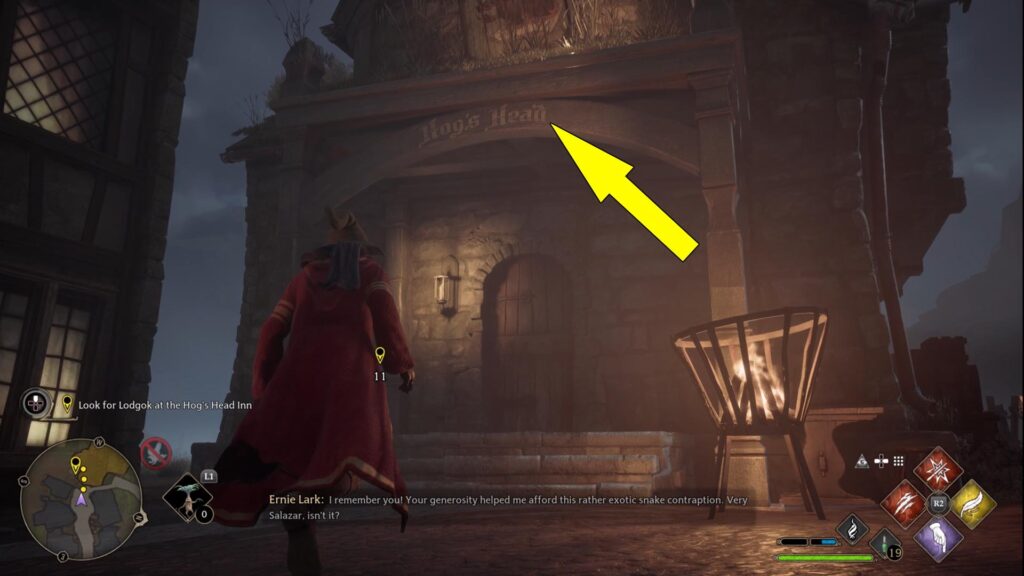
Now, follow the path marked on your minimap, and you’ll find Hog’s Head Inn at the end of an alley. Once inside, before talking to Lodgok waiting at the table, check the backroom for a chest and one of the Hogsmeade Demiguise Statues. Approach Lodgok next, and when he asks you why he should trust you with Ranrok’s plan, you’ll have two dialogue choices:
- Sirona trusts me.
- Perhaps I misjudged you.
No matter what you choose here, the outcome is the same, meaning that Lodgok outlines that there is a way for him to gain Ranrok’s trust, thus finding his plans.
Next, Lodgok will share a small story about an important Gobling Relic. Specifically the Helm Of Urtkot that a witch stole. Goblins think the relic is inside the witch’s sarcophagus, hidden in a cave only wizardkind can access. According to Lodgok, he may earn Ranrok’s trust again by bringing the Goblin Relic.
After this short story, the following dialogue choices won’t play a major role in the game’s plot, and you’ll eventually have to find the Helm Of Urtkot.
Hogwarts Legacy Witch’s Tomb Location
Great job! Now that you have agreed to help Lodgok, he’ll ask you to meet him near the Witch’s Tomb. From your current location, open your map, then switch to the World Map. You’ll see that the meeting point is west of Hogsmeade. Jump on your broom and fly to the location on your map to find Lodgok.
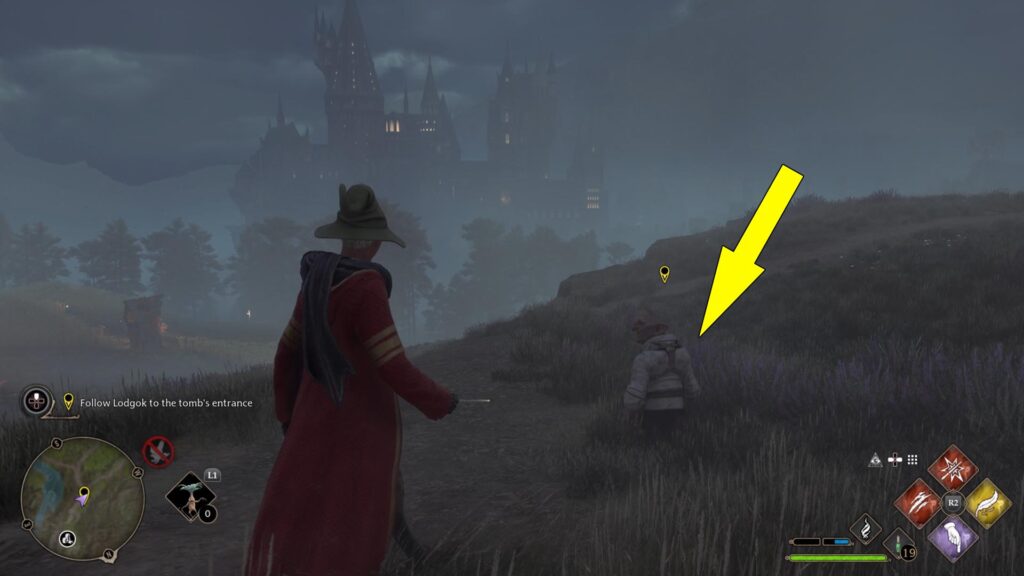
Now, you’ll want to follow Lodgok to the Tomb’s entrance, so stay close to him and listen to what he has to say because he’ll tell you the story of the Helmet Of Urtkot and why it is so important to Goblins. After finding the Tomb’s Entrance, feel free to ask Lodgok any questions you may have, then step inside the cave.
Witch’s Tomb Helmet of Urtkot Location (All Puzzles Solutions)
Before starting our journey into the Tomb, there are two important spells that you’ll constantly use while exploring the next area. These spells are Lumos and Depulso, so make sure you equip both of them by pressing Right on your DPad.
Now let’s see where to find the Helm and all Treasure Chests in the Witch’s Tomb. From the Tomb’s entrance, follow the tunnel ahead until you reach a locked door with some butterflies on it.
First, get the Galleons on the right side while facing the door, then head left, and you’ll reach a short tunnel. Here, you should see a moth (butterfly) on top of a device. On the right side, there is also a bag you can loot.

The first Hogwarts Legacy Helm Of Urtkot puzzle is very similar to the one you have completed while playing the Like A Moth To A Frame side quest, meaning that you have to cast Lumos, and the moth will follow your wand. So, pick up the moth, return to the locked door, and cast Lumos again to place the butterfly on it.
In the next area, check both sides of the main tunnel. On the right side, you’ll find some Galleons, and on the left side, a Treasure Chest.
Keep following the path ahead, and you’ll reach a second door. The next puzzle follows the same logic as the previous one, but you’ll need three butterflies. One is on the left side, flying on top of a device. Next to it, you’ll also find some Galleons.
The second moth is on the right side while facing the locked door, flying above another device. Cast Lumos next and place both of them on the locked door. Now cast Depulso on the door on the left side of the second moth (pictured below).

Behind the door marked above is another Treasure Chest and the third butterfly you’ll need to place on the door to progress. Once you reach the next room, you’ll need to deal with some Inferi. Remember to cast fire-based spells to defeat them faster.
After clearing the room, start by casting Depulso on the rock wall on the right side as you enter to find a bag and some Galleons in the area behind. On your way out of the room, there is a Sarcophagus on the upper left ledge. Climb the wall to loot it, then follow the next tunnel to reach the third door you’ll have to unlock. In this room, you’ll also find a new type of mechanism, and you’ll have to find three butterflies.
Here is how to solve the following puzzle:
- Cast Lumos and pick the moth on the right side of the room, placing it on the device in the middle of the chamber.
- On the left is another butterfly you’ll have to pick and place on the same device.
- Cast Depulso on the device on which you have placed the two butterflies.
- After rotating the device, jump on the moving platform on the right side of the room, and it will take you to the upper ledge, where you’ll find the third moth.
- Cast Lumos, return to the locked door, and place the third butterfly on it.
- Finally, return to the device where you placed the two moths, pick them up one by one, and place them on the door.
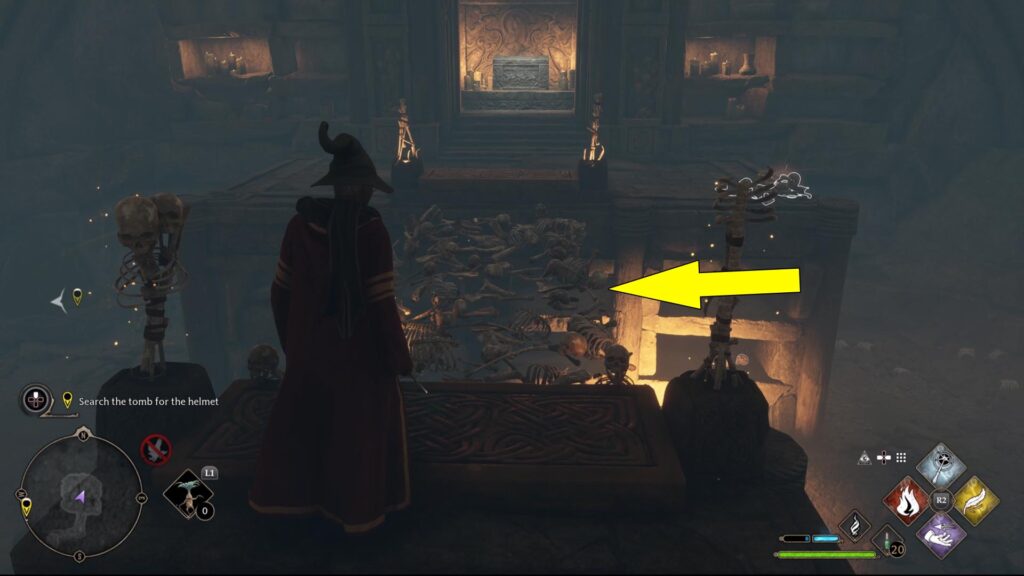
When you step through the third door, check your minimap, and you’ll see a passage you can explore on the right side. Climb the ledge and follow the next tunnel to get to a room where you should see a lot of skeleton bones.
Witch’s Tomb Skeleton Bones Room Puzzle
The next room you will explore features a coffin on the other side. But as you are about to see, a huge gap stops you from reaching it. This is a bonus room and is not connected to the main objective. If you want to solve the next puzzle, you’ll want to start by attacking the piles of bones in this chamber.
Next, while standing on the platform at the edge of the gap, cast Accio while targeting the skeleton bones you attacked earlier. This way, you can create a bridge to cross the gap and reach the Treasure Chest.
Awesome! Return to the main tunnel, jump to the ground floor, and loot the Galleons on the right side. Head west now, and in the next room, loot the Treasure Chest on the other side and grab all Galleons you can find by going around the chamber.
The next step is to cast Depulso on the northern door and use the platform in the next room to reach the upper level where a treasure chest awaits. Open it, head back to the ground floor, and use Accio to move the platform to the right.
Climb on it and loot the next treasure chest, which is actually The Collector’s Cave Collection Chest (collectible), then head back to the previous room. To continue your Hogwarts Legacy Helm Of Urtkot search, you’ll need to figure out how to exit the round room, and the answer is found on the ceiling. So, look up, and you’ll see a crate held by a hook you can destroy with your Basic Cast.

After you drop the crate, jump through the hole in the floor and head southeast. Follow the empty tunnel ahead, and when you reach the end, on the right side, you’ll see a device you can pull with Accio. This device unlocks the secret door in the previous room, creating a shortcut.
Now jump again through the hole in the floor, but this time, head west, looting the bag on the left side as you exit the water.
As you enter the next room, first deal with the Inferi that ambush you. Next, you’ll want to look around to spot a device you can spin using Depulso, as well as several butterflies. The door you’ll need to unlock is on top of a ledge on the upper side of the room. To solve this last puzzle, start by casting Lumos and pick the butterfly on the left side (south) of the room, then place it on the spinning device. Do the same with the moth on the right side of the room (east).
Now the spinning device is active, so step on the platform behind it, and while facing the device, cast Depulso twice. When you reach the upper floor, check the northern side first because there are three Chests you can loot. Two are in the chamber at the end of the tunnel, and one is near the butterfly on top of the ledge.
Return to the ground floor, then cast Depulso twice while standing on the platform, followed by Arresto Momentum to slow the device. Grab the butterfly on the northern ledge (1 in the picture below) and quickly get to the door by crossing the moving platform.
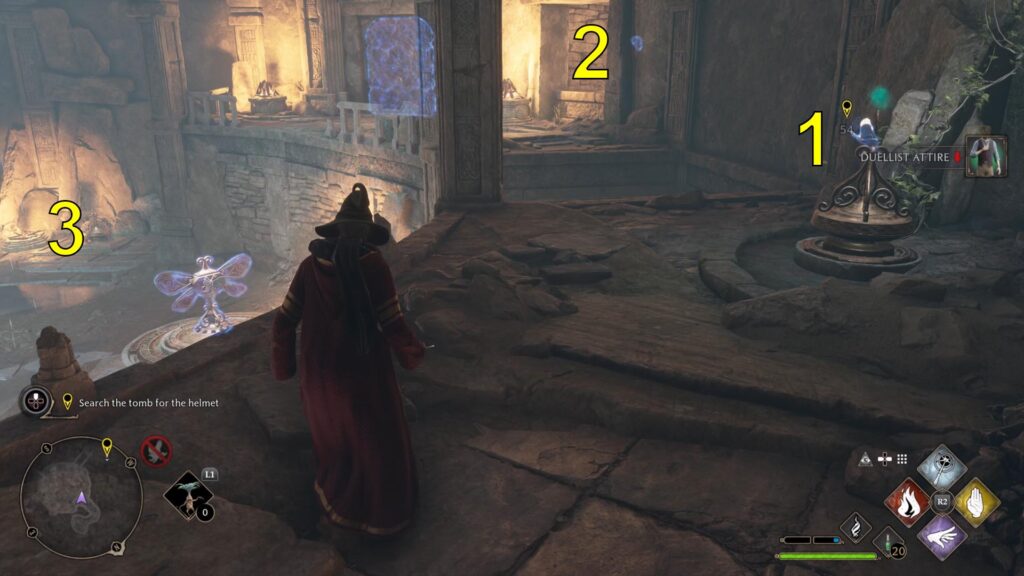
The second butterfly is more accessible because it’s in an alcove (2 in the screenshot above) near the door.
The third moth is the trickiest because you’ll need to use the device (3 in the screenshot above). Basically, you’ll have to return to the ground floor, get one of the butterflies in the room, and place it on the device we have marked. When you raise the platform, the device where you have placed the third moth will also ascend, and you can get the moth while standing on the balcony near the locked door.
Remember that you can also cast Arresto Momentum when you raise the platform, and you’ll have to cast Depulso twice to spin the device with the two butterflies. After placing the third moth, you’ll enter the last chamber where the witch’s coffin awaits. Before approaching it, loot the large chest and get all Galleons.
As you are about to find, the Helmet is missing because some Ashwinders reached this room before you. Get close to the wall behind the sarcophagus and exit to North Hogwarts Region, and you’ll find Lodgok waiting for you. When you explain that the Ashwinders took the Helmet, he’ll tell you there is a camp nearby and, most likely, the Helmet is there.
How To Recover The Helmet From The Thieves
Hop on your flying broom, and from your current location, fly northwest to find the camp. Here, you’ll need to deal with many Ashwinders and a Troll. Upon clearing the area, you’ll find the Helmet Of Urtkot inside a chest. Look for the chest in the first tent on the right side as you move across the bridge from south to north.

Now that you have found the Helmet Of Urtkot, it goes without saying that you’ll want to fully explore the camp and loot everything before returning to Lodgok, who is waiting for you near the Collector’s Cave entrance. Tell him what you think about the Helmet, and he’ll tell you he’ll take it to Ranrok. So, for now, you’ll have to wait to see if Lodgok’s plan works.
After finishing Hogwarts Legacy The Helm Of Urtkot, if you have already completed the Beasts Class and Caretaker’s Lunar Lament, you’ll start In the Shadow of the Estate story quest and The Elf, The Nab-Sack, and the Loom. Furthermore, A Friend In Deed and The Tale Of Rowland Oakes are also available.
