The Caretaker’s Lunar Lament is a stealth-focused Hogwarts Legacy quest that introduces a new type of collectibles in the video game inspired by the Harry Potter universe and published by Warner Bros. Games.
Hogwarts Legacy Caretaker’s Lunar Lament also unlocks one of the most useful Spells in the game: Alohomora. Using the upgradable Spell known as Alohomora, you can unlock doors to reach new areas and chests you can’t open otherwise.
To start Caretaker’s Lunar Lament, you’ll need to meet Gladwin Moon, but this quest requires you to finish Percival Rackham’s Trial story quest first. Once you beat the first trial, you’ll receive a letter from Gladwin Moon asking for your help.

The letter activates the quest, and you can track it in your Field Guide. It reads:
“I hope you will come and see me about a pressing and highly confident matter at your earliest convenience. I believe that we may be able to help each other.”
To find Gladwin Moon, open your map while tracking the quest and fast-travel to the Grand Staircase Floo Flame in the Grand Staircase area of Hogwarts. Now, from the said Floo Flame, follow the stairs up, and you’ll eventually reach the quest’s starting location, near a wall.

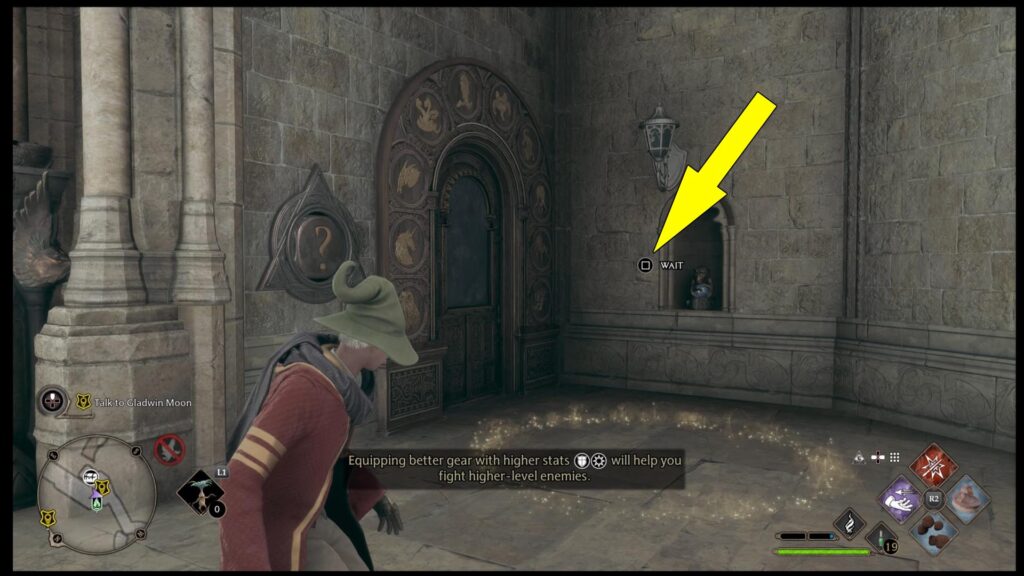
Press the corresponding button to start the quest, and Gladwin Moon will spawn next to the nearby wall. After Gladwin Moon introduces himself, he’ll get straight to the point—specifically, a discovery involving the small statue on the wall nearby.
The statue in question depicts a monkey holding a stone. What’s so special about the statue is that during the night, you can remove the stone from the monkey’s arm. And your first objective is to remove the Demiguise Moon from the statue next to you. So get close to it and press the button on your screen to pick it up.

After removing the Demiguise Moon, the statue vanishes. Odd, right? Now, let’s see what Gladwin knows about these little idols.
Follow him, and he’ll explain that the day you were in Hogsmeade fighting the Troll, Gladwin was also visiting the village. During his visit, he encountered a Boggart, a creature from Harry Potter’s universe that takes the shape of whatever scares you the most.
So, in Gladwin’s case, the Boggart took the shape of a Demiguise, a creature that looks like the small statue you found earlier, capable of seeing the future.
The problem is that some students learned about Gladwin’s fear, and he assumes they placed Demiguise statues everywhere to make fun of him. To find the persons behind this joke, Gladwin wants you to find and remove all Demiguise statues.
He’ll also tell you why he picked you to find them. When asked if you’d like to help, answer however you want, as your choice will not affect the current quest or the story. To help you get to the first Demiguise Statues, Gladwin will help you learn Alohomora, so make sure you complete the associated minigame and use your wand to follow the pattern on the right side of the screen.
How To Open the Faculty Tower Door (Puzzle Solution)
Now that you have learned the Spell, it’s time to practice it and open the Faculty Door nearby. Approach the door and interact with it to cast Alohomora. Again, you’ll have to complete a minigame.

To open the Faculty Door and unlock all doors, use the Right Thumbstick to push the green spark (marked above by the upper right arrow) in the green area, then rotate it until the green gear (marked by the lower right arrow) starts moving.
Without moving the Right Thumbstick, do the same with the red spark and the Left Thumbstick, except you’ll need to guide it to the red area (upper left arrow above) and rotate it until the red gear (lower right arrow) moves.
Prefects’ Bathroom Demiguise Moon
Now that you have opened the Faculty Tower, you’ll enter a restricted area, and you must avoid being spotted. Start by equipping the Disillusionment Charm and cast it to become invisible. Follow the stairs ahead and make sure you stay away from all NPCs you’ll encounter.
Keep following the path on your minimap, go up two floors, then follow the spiral stairs until you see a statue near another staircase. Next, you’ll want to unlock the door on the right side using Alohomora. Complete the associated puzzle, and when you enter the Prefects’ Bathroom, stay on the left side of the room.
The Prefects’ Bathroom Demiguise Moon is waiting for you on the other side of the room, behind the large pool.

After you retrieve the first Demiguise Moon, head outside the Bathroom to go for the next one.
The Hospital Wing Demiguise Moon
When you return to the lobby, follow the spiral staircase behind the statue and move up one floor. Turn left next, and you’ll see the Hospital Wing and the Demiguise Moon waiting for you on the desk on the other side.

Make sure you avoid the teachers and grab it without being spotted. Now, it’s time to return to Gladwin without being spotted. Don’t worry because the AI in the game is not as bright as you think. Simply maintain your distance from all NPCs.
After returning to Gladwin, he’ll tell you he is determined to find his tormentor, but you’ll need to find more moons. Regardless of whether you agree to help or not, you’ll still trigger the next quest, and you’ll still be able to get the collectibles.
By completing Hogwarts Legacy The Caretaker’s Lunar Lament main quest, you’ll start The Man Behind The Moons side quest, which requires you to find 9 Demiguise Moons.
