Hogwarts Legacy The Library Annex Collection Chests are trickier to obtain than the Bell Tower Wing Collection Chests, mainly because most are locked behind puzzles. However, if you aim for 100% completion in Hogwarts Castle or just want some cool wand handles and conjuration recipes, you need to get all of them.
Also, the Library Annex Collection Chests count as progress toward unlocking the Collector’s Edition Trophy/Achievement.
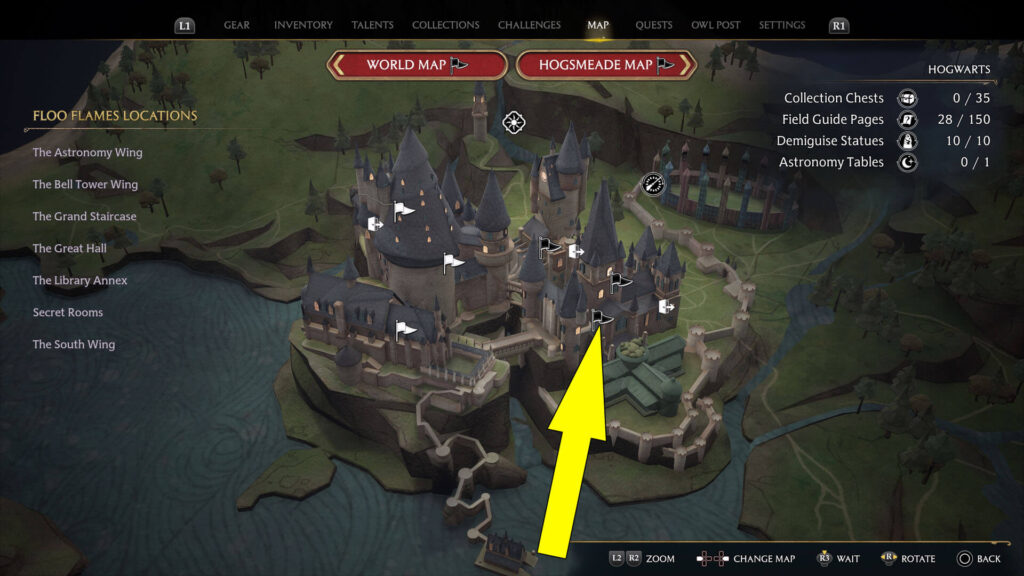
Where To Find the Eight Library Annex Collection Chests in Hogwarts Legacy
To quickly get to the Library Annex area, open your Hogwarts Castle map, select the bottom right flag, and fast-travel to one of the five Floo Flames. Now, let’s see where to find the chests.
Collection Chest #1: By the Water
For the first Library Annex Collection Chest, you have to fast-travel to the Viaduct Courtyard Floo Flame in the Great Hall area. From the fast travel point, go down the stairs northwest to reach a bridge with four unlit braziers on its railings.
To continue, you have to solve a puzzle, which counts as one of the three Hogwarts Secrets. Now, check the braziers on the bridge (two on the left railing and two on the right railing) to see that each one has a symbol under it. Also, each brazier has a small Roman numeral on it. Then, go to the northwestern end of the bridge to spot a golden sewer cap with the four symbols (from the braziers). Next to each symbol, you have a Roman numeral.
As you probably guessed, you must match the brazier symbols with the Roman numerals following the same order as the one on the sewer cap. So, go to the brazier northeast of the sewer cap, cast Confringo on it to light it, and accordingly to the symbol, you must interact with it until you see the Roman numeral IV.
Then go to the brazier southwest of the sewer cap and select the Roman numeral II. But don’t forget to light the brazier with Confringo, or else you can’t interact with it. Time to go on the other side of the bridge for the other two braziers.
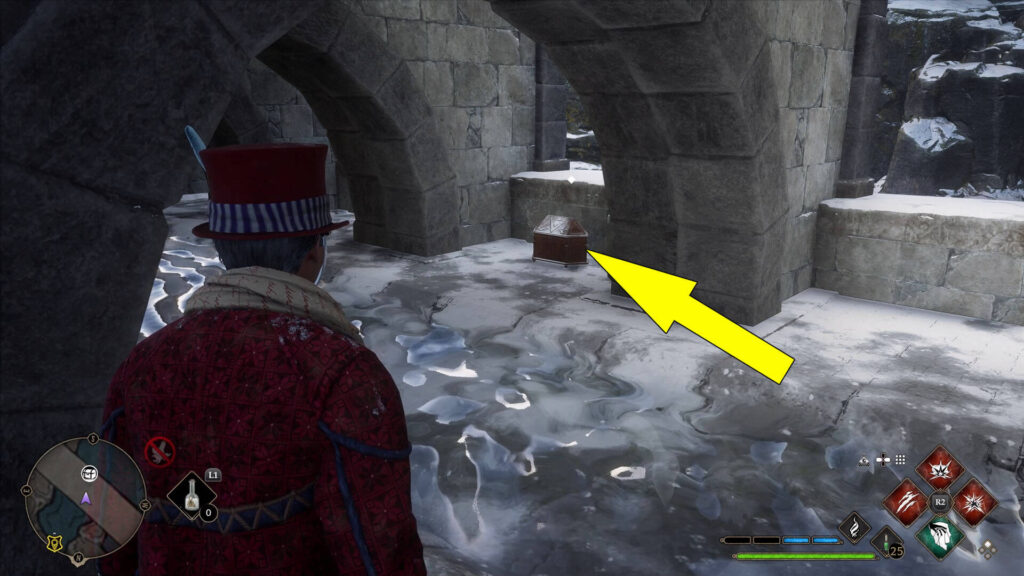
Select I for the brazier northeast on this end of the bridge and III for the brazier southwest. Again, don’t forget to light the braziers using Confringo. If you do everything correctly, the sewer cap can now be opened, completing one of the 3 Hogwarts Secrets, and you can go down the ladder. Once down, head southeast through the water to find the first Hogwarts Legacy Library Annex Collection Chest on the left side.

Collection Chest #2: Also by the Water
Upon obtaining the first Chest collectible, continue southeast through the water. You should shortly see the second Library Annex Chest on the right side.
Collection Chest #3: Next to a Lamp
The third Chest collectible will require you to fast travel to the Library Floo Flame, then head east, pass the spiral staircase and the bookcase to reach a gate. Go through the gate, down the stairs, head left, then left again, turn right, and go forward until you reach the wall.
Now, head right, go down the stairs to the left, and make your way forward to reach the other side of the room, where you can find a door. Head through the door, go down the stairs, and make your way to the desk with the lamp. Next to the lamp, you have the third collectible.

Collection Chest #4: Under a Painting
The fourth Collection Chest in the Library Annex will require you to solve an animal door puzzle, which you can find by first fast-traveling to the Divination Classroom Floo Flame. Then, go up the stairs northwest of the Floo Flame, head left, and proceed until you can go to the right, where you can see a door surrounded by animal symbols.
To solve the puzzle and open the door, you must first interact with it. Two triangles should appear on the door, but for now, focus on the top one. As you can see, in the middle of the triangle is the number 9, and around it is a Hydra symbol, the number 2, and a question mark. It’s important to know that each animal symbol has a number assigned to it.
To figure out which number corresponds to which animal, know that the Owl on the bottom left of the door is 0, the Unicorn above 1, the Goat 2, and so on going clockwise until you reach the Kraken on the bottom right, which is 9.
This means the Hydra on the top triangle is a 3, and knowing that the number in the middle of the triangle (9) is the sum of the numbers and symbols around it results that the question mark can only be a 4, which is assigned to the Scruffy Owl.
As such, interact with the triangle with the question mark left of the door until it displays the Scruffy Owl symbol. Now, follow the same logic for the bottom triangle on the door to determine that the two question marks stand for the number 3, which is assigned to the Hydra symbol. Interact with the triangle with the two question marks on the right of the door to make it display a Hydra.
Just like that, the door can now be opened to find the fourth Hogwarts Legacy Library Annex Collection Chest under a painting as you enter.

Collection Chest #5: Next to a Desk
After getting the previous collectible, head up the stairs, go forward, and through the door to the left to reach another two doors with animal symbols. The fifth Library Annex Collection Chest is behind the southeast door, and to reach it, you must solve the same type of puzzle as you did for collectible #4.
Hence, interact with the door and do the math to find out the question mark on the top triangle is a 4 (Scruffy Owl). Interact with the triangle left of the door to make it display the Scruffy Owl symbol. Now, do the math for the bottom triangle to learn that the two question marks represent the number 5 (Crab). Interact with the triangle right of the door to roll a Crab symbol. Finally, open the door to find Collection Chest #5 beside a desk.

Collection Chest #6: Under a Drawing
Now that you’re done with Chest #5, head to the remaining animal door puzzle in the room and interact with it. You know the drill: do the math to find out that the question mark on the top triangle is a 6 (Salamander). Then, go to the triangle left of the door, the one with a single question mark, and interact with it to roll the Salamander symbol.
Repeat the process for the bottom triangle to conclude that the two question marks represent the number 1 (Unicorn). Interact with the triangle with the two question marks to the right of the door to roll a Unicorn symbol. You can now open the door and find the next Hogwarts Legacy Collection Chest under a drawing.

Collection Chest #7: Next to a Lion Statue
For the seventh Collection Chest, you must solve yet another animal door puzzle, the last one; I promise—first, fast travel to the Bell Tower Courtyard Floo Flame in the Bell Tower Wing area.
Then, go through the door next to the Floo Flame (southeast), head down the stairs, and turn right to spot the puzzle door. Interact with the door and start calculating again to learn that for the question mark on the top triangle, you have a 2 (Goat). Roll the Goat symbol on the triangle left of the door. Do the math, one last time, for the bottom triangle on the door, and you’ll figure out that the two question marks represent the number 1 (Unicorn).
Now find the triangle with the two question marks on the wall right of the door, next to the troll in the display case, and roll the Unicorn symbol. Finally, head inside to find the seventh Collection Chestin Hogwarts Legacy Library Annex beside a lion statue behind a painting.

Collection Chest #8: At the End of a Depulso Puzzle
The last Library Annex Collection Chest is found by solving a tricky puzzle in Depulso Puzzle Room 1. Upon completing the puzzle, you can find the Chest collectible as you exit the room.