Niamh Fitzgerald’s Trial, unlike the Hogwarts Legacy Trials you have completed for the previous two Keepers (Percival Rackham and Charles Rookwood), is not focused on solving puzzles but on stealth gameplay.
Niamh Fitzgerald’s Trial is the third Hogwarts Legacy Keeper Trial, and while playing it, your task is to survive. Compared to the previous two Hogwarts Legacy Trials, the one you must complete for Niamh Fitzgerald is more accessible, provided you know how to hide and remain unseen.
Since there are no Treasure Chests to be found in Niamh Fitzgerald’s Trial quest, and because you won’t have access to your spells at first, the following walkthrough reveals the proper path you need to follow and how to avoid being detected by the enemies you’ll encounter. As with all Trials, you won’t be able to progress the story in Hogwarts Legacy without finding out what happened to Niamh Fitzgerald, meaning you’ll need to complete her test.
How to Access the Headmaster’s Office in Niamh Fitzgerald’s Trial
To be able to play Niamh Fitzgerald’s Trial, as you may remember from our Headmistress Speaks walkthrough, you’ll have to get to the Headmaster’s Office, but you can only enter using the password obtained from Scrope. The password is Toujours Pur, as Scrope tells you during The Polyjuice Plot quest.
So, after you complete both main quests above, it’s time to enter Black’s Office; however, remember that your character must reach at least Level 23. When ready, open your Field Guide Map, followed by the Hogwarts Map. From the list of Floo Flames on the left side of the screen, select The Grand Staircase, then the Trophy Room, which is the closest Floo Flame.
After you fast-travel, cross the Trophy Room moving northeast, head right, and follow the stairs up. Keep following the yellow path marked on your minimap, and after you climb the spiral stairs, head through the small door on the right side, then turn left. Eventually, you’ll be able to spot the Gargoyle Statue guarding Black’s Office.
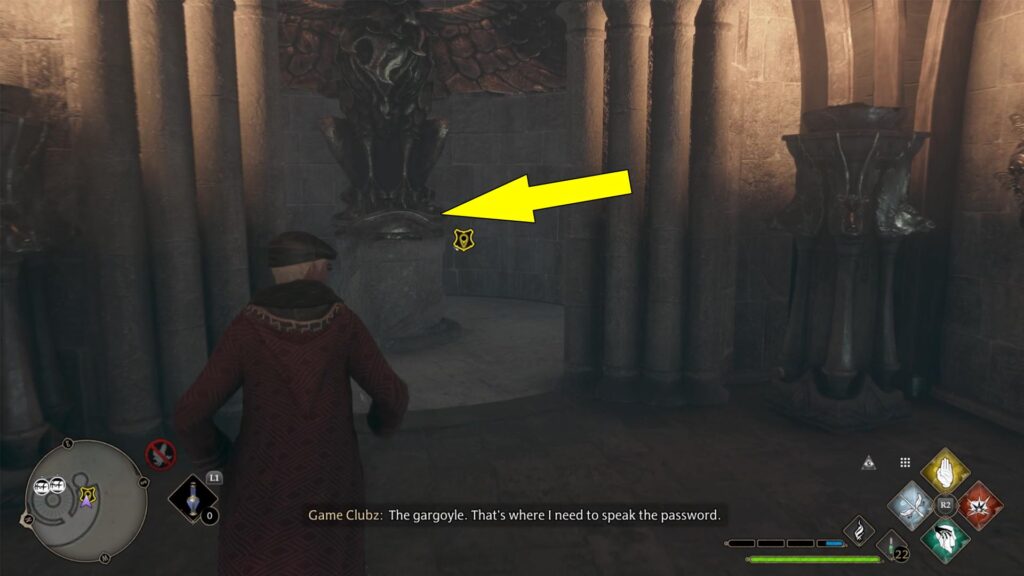
Approach the gargoyle and whisper the password by pressing Square/X, then follow the stairs to enter the Headmaster’s Office. While inside Black’s Office at Hogwarts, approach his desk, and you’ll have a conversation with Niamh Fitzgerald.
She’ll tell you that to start her trial, you must approach the pedestal nearby and read the book that appears. If you ask her what you will find in the book, Niamh won’t provide too many details except that you’ll find a story. Good, now you are ready to start the third Hogwarts Legacy Trial, so climb the stairs behind the desk, and you’ll find the book on a stone pedestal. Interact with it by pressing Square/X.

How To Make Your Way Through the Town Without Being Seen
After reading the book, you’ll enter Niamh’s Trial, which, as you can see it’s different than the rest. Besides the black-and-white environment, you’ll notice that all your spells are gone.
What you should know about the path ahead is that the town you must cross without being seen is similar to a maze. Since there are no Treasure Chests to be found, focus on the enemies you’ll encounter and, as much as possible, follow the steps outlined in our Hogwarts Legacy Niamh Fitzgerald’s Trial walkthrough.
Once the trial starts, head north from your current location, then cross the bridge ahead. Soon, you’ll be introduced to a new type of enemy known as the Death’s Shadow. These enemies will instantly kill you if they spot you. Luckily, they are not very smart. Now, take cover behind the crates on the left side, then pay attention to the Shadows in the distance. When they are facing the other way, move to the crates on the right side of the road.

While hidden, make sure that the Shadows on the left side are facing away, and quickly move north, crawling under the wooden plank above the road. From here, follow the path ahead and jump to the lower section. Keep moving west, and look around the left corner of the house on the left side.
In the distance, you can see a Death Shadow on the main path and some crates on the right side of the road. Move behind them, and don’t worry because the Shadow on the street can’t see you.

While behind the crate on the right side (marked above), you’ll have to wait for the Shadow on the road to move left; however, there is another Shadow that patrols the area. The idea is to exit the hiding spot when both Shadows move up the hill (east). After you cross the previous section, head south, and once you descend the stairs, you’ll see more Shadows.
Hide behind the barrels on the right side, then wait for the Shadow by the large wheel to leave.

When the Shadow turns around, move to the mill wheel in the distance and crawl to the next section. Next, you’ll want to move north, then head left to return to town. Once you reach this section, you’ll want to quickly climb the ladder and reach the roof of the southeastern house.

On the roof, head left and drop on the ballots behind the house, then turn right and take cover behind the small wall on the right side.
The next section requires perfect timing. To cross to the other side of the small plaza, pay attention to the Death Shadow that patrols the area. When the Shadow moves towards the cart with barrels in front of it, exit your hiding spot and head west, but stay on the right side of the cart in the central area.

As you hide behind the crates on the left side of the next alley, pay attention to the Shadow that patrols around, and move west only when the Shadow faces the other side. Now, make sure you stop when you reach the next vending stall and wait for the second Shadow to move away.
When it does, the coast is clear, and you can move west. Get close to the large Death at the end of the alley, and you’ll trigger a small cutscene showing more Death’s Shadows spawning. Since they block the path ahead, retrace your steps and go through the large door that opens. You should see it in the northeastern building.
Get inside the house and climb the stairs to the second floor. Eventually, you’ll reach a room where more Shadows await. To get to the other side, you’ll need to sneak behind the Shadow that patrols the room while the other is in the right corner.

Move slowly behind the Shadow, then turn left and cross the wooden planks. Follow the stairs down, then move southeast to reach a small plaza. In the middle is a Mysterious Cloak. Make sure you interact with it because it’s the first Deathly Hallow, also known as the Cloak of Invisibility.
Now that you have the first Hogwarts Legacy Deathly Hallow, it is time to go after the next two—specifically, the Resurrection Stone and the Elder Wand. Head through the open gate, turn left, and don’t worry because the Shadows ahead can’t spot you.
So just follow the road west, then turn left to reach another small plaza. Step on the plate in the middle, and in the next area, approach the Elder Wand and pick it up. After you find the Hogwarts Legacy Elder Wand, you’ll gain access to specific spells, but they are enough to fight the enemies ahead. To progress through this quest, cast Bombarda on the stone wall in the next area.

Now, you’ll want to head south and then west to reach the entrance to a castle. Get ready because here you’ll have to fight your way and deal with several Death Shadows. Once you defeat them, enter the castle, but stay alert because, in the courtyard, you’ll need to deal with even more Death’s Shadows and several Death’s Dark Mongrels.
After you defeat them, head through the castle’s southern gate, then turn right and climb the stairs to reach the upper courtyard. As you can guess, in this courtyard, you’ll get ambushed by an impressive number of enemies. Besides Death’s Shadows and Death’s Dark Mongrels, you’ll also have to face several Death’s Trolls.
Winning this fight is mandatory to progress the quest, so use everything you have learned from your professors. After you deal with them, the western gate opens, and you can move forward and step on the next plate, which will bring you to the last Deathly Hallow: The Resurrection Stone. But you’re not done with Niamh Fitzgerald’s Trial yet.
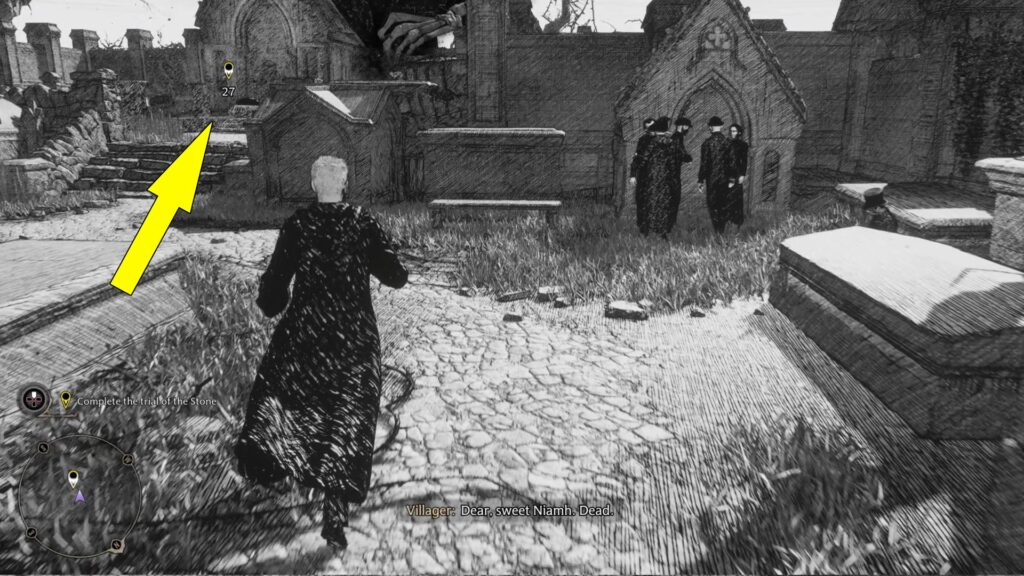
How To Complete the Trial of the Stones
To complete the trial of the stones in Hogwarts Legacy, you’ll need to find Niamh Fitzgerald inside the cemetery. From your current location, follow the path west, then turn left, and you’ll see your objective in the distance.
Interact with Niamh’s body; she’ll tell you that the Resurrection Stone you’ve found can’t bring her back to life.
Now, follow Niamh to her Pensieve nearby and pay attention to what she has to say. After witnessing Niamh Fitzgerald’s memory in the third Pensieve, you’ll learn that Isidora Morganach tried to convince her that the Ancient Magic should be used on people.
Isidora even used it on Niamh to prove that by removing the pain from people, her magic became even stronger, which explains why she started to harness it and store it in the repositories. Although Niamh tried to convince Isidora to stop, the fifth Keeper refused, thus turning against all other Keepers.
After watching Niamh’s Memory, it’s time to return to the Map Chamber to interact with the northwestern glass wall. Inside the Map Chamber, approach the portraits, and you’ll get to meet the fourth Keeper: San Bakar.
While talking to Professor Bakar, he’ll confirm that Isidora inhaled the pain he took from Niamh. Your dialogue choice during the conversation will not change the story, although you must admit it was disturbing. Regardless of how you answer Professor San Bakar, he won’t tell you the location of the fourth trial since he doesn’t trust you yet.
Once you are done talking to San Bakar, discuss your latest discoveries with Professor Fig. After finishing Hogwarts Legacy Niamh Fitzgerald’s Trial, you’ll unlock the next main quest, In the Shadow of the Mountain.
At this point, as you are getting closer to the end of the story, you should consider working on all side requests you have available and also focus on finding as many collectibles as you can.
