In The Shadow Of The Mine is a main quest in the video game developed by Avalanche Software, which allows you to continue your search alongside Sebastian for a cure that could save Anne. In The Shadow Of The Mine takes place inside the Hogwarts Legacy Overlook Mine and features several puzzles alongside two Collection Chests.
Since it’s part of your story as a fifth-year student at Hogwarts School of Witchcraft and Wizardry, In The Shadow Of The Mine is mandatory for progressing the game’s plot. As you may remember, while playing In the Shadow of the Estate, you discovered that Sebastian’s sister, Anne, was cursed while investigating a fire at Isidora Morganach’s former house.
So basically, Sebastian and Anne’s story is connected to yours since you must also find the truth about Isidora. But further investigations are required to find out what happened to Anne.
Where To Find Sebastian by the Overlook
To be able to play In The Shadow Of The Mine main quest, first, you’ll have to complete Professor Weasley’s Assignment, which allows you to unlock the Bombarda Spell. Furthermore, your character must reach level 22, which is relatively easy if you follow our Hogwarts Legacy Wiki Guides and find all collectibles in the game while working on other side quests.
When these two requirements are met, open your Field Guide and check the Quests Tab. You should be able to see that there are two active main quests: In The Shadow Of The Mine and It’s All Gobbledegook.
While tracking In The Shadow Of The Mine quest, check the Map Tab, followed by the World Map. You should see that Sebastian is found in the North Ford Bog region, north of Upper Hogsfield Village.

The closest Floo Flame you should opt for, if you unlocked it, is East North Ford Bog; however, you can also fly on your broom to the meeting spot. You should be able to see Sebastian near a small graveyard. If he’s not there, approach the glowing circle on the ground and wait for him by pressing Square/X.

When talking to him, Sebastian will tell you that although he was pretty busy, he figured out what was the image in the Triptych, and he knows the area very well. While waiting for you, he scouted the area ahead and found the Overlook Mine you are about to explore.
So, Ranrok’s Loyalists protect the mine for a reason. Now, he’ll ask you how you would want to handle the Loyalists, and you have two choices:
- Perhaps we can avoid detection
- We deal blows
The choice you are about to make determines Sebastian’s behavior, which means that if you wish to avoid detection, Sebastian will do his best to remain unseen. On the other hand, if you go with We deal blows, Sebastian will also become aggressive and support you in combat. So, pick the one that better fits your playstyle.
Where To Find the Mine Entrance
After you and Sebastian decide how to approach the enemy camps, follow the path northeast, and you’ll soon find a Goblin Camp. As you can guess, to progress, you’ll need to deal with the Loyalists. Once you clear the camp, take your time and loot everything you find, including the Collection Chest inside the tent, because it counts as one of the 8 Hogsmeade Valley Collection Chests.
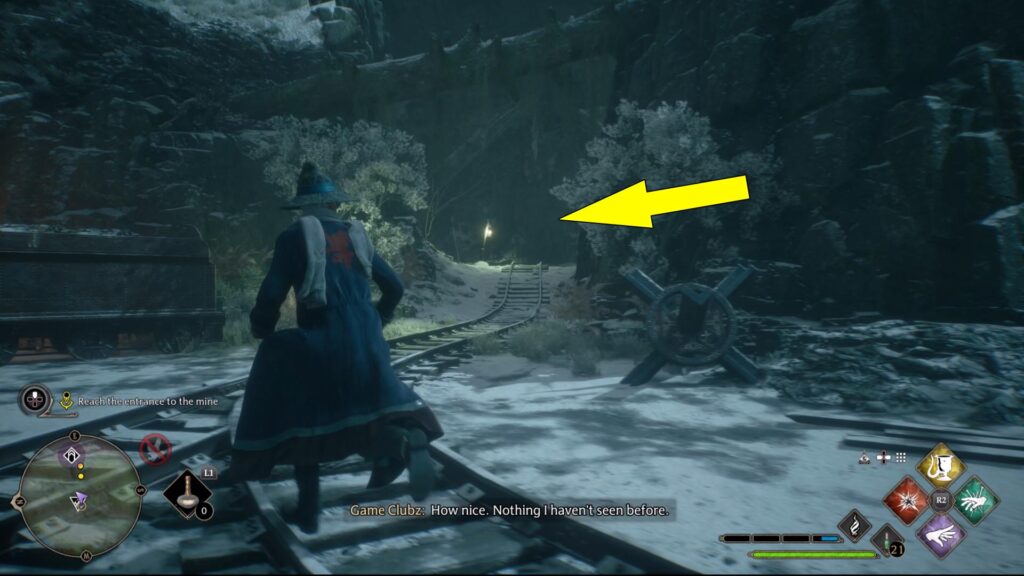
Now, follow the train tracks northeast, and you’ll reach the second Camp you’ll have to clear. Again, you’ll find one of the Collection Chests here, so take your time exploring it as soon as all Goblins have been removed. From the second camp, you’ll want to follow the train tracks, which will eventually lead you to the Overlook Mine entrance.
In the Shadow of the Mine Rune Symbol Location
After entering the mine, your next objective is to find the Rune Symbol; however, before moving forward, it’s worth pointing out that there are two Collection Chests you don’t want to miss inside this mine. If you struggle to find them, refer to our Overlook Mine Collection Chests locations guide. Now, back to our Overlook Mine Rune Symbol and where to find it.
From the entrance, the path ahead is linear at first, so follow the main tunnel, and you’ll reach a large cave with a gap in the middle. First, deal with the two Goblins, then burn the spider web on the right side and jump over the hole to loot the bags and the Galleons. Now, go around the gap, following the southeastern wall, and climb the first ledge. In the next tunnel, you’ll see a danger sign on the right side.
Slide down to reach a larger cave and defeat all Goblins, then explore the cave, looting everything, including the Collection Chest behind the spider web on the southeastern side of the cave. Once you’re done, head back to the large cave and look around for a crate you can place near the western wall.
Cast Wingardium Leviosa and place the crate so you can climb on it and progress through the cave.

Additionally, you can place the same crate near the northern wall first and climb the ledge to find another Treasure Chest. Upon reaching the upper level, keep moving west, and you’ll find another cave with a gap in the center. Before following the marker on the minimap, cross the bridge over the gap to find a Treasure Chest.
Next, move through the southeastern tunnel and slide to the area below. From here, there is only one path, and it leads to another cave that is partially flooded. When you enter, it is recommended to explore the lower floor first to get the following loot:
- A bag and some Galleons in the southeastern tunnel, behind some planks, you can destroy with Depulso
- A Treasure Chest on the northeastern side of the cave which requires you to swim
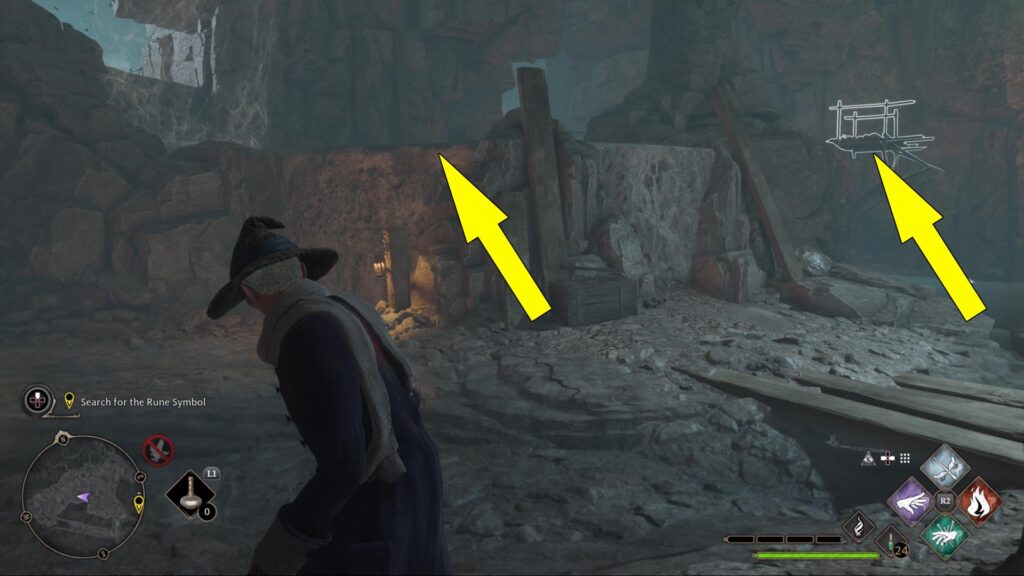
After looting the items, climb the northwestern wall (marked below), burn the spider web on the left side to get another Treasure Chest, then repair the bridge ahead (also marked below).
To repair the bridge, equip and cast Reparo, then cross to the other side and deal with the Venomous Scurriour. After you loot the bag and the Galleons in the area where you fought the spider, progress through the tunnel marked on your screen (southeast). Eventually, you’ll reach a section where the tunnel splits in two.
Make sure that first you check the one on the right side, but equip and use Lumos to remove the roots that will instantly kill you. Once you enter the next cave, you’ll find the second Collection Chest in a smaller cave on the right side. Another Treasure Chest can be found in the same tunnel but on the upper ledge, which is covered in vines (pictured below).

To get to this chest, you’ll want to cast Lumos first, get close to the brazier on the right side, and immediately cast Incendio to light up the brazier. Now, retrace your steps to the main tunnel, then head east and enter a smaller tunnel. Destroy the wooden boards with Depulso to find a new Treasure Chest.
Once again, return to the main tunnel and follow the marker on the screen to enter the next section, where you’ll get ambushed by spiders. Deal with them first, then crawl through the hole in the eastern wall. Now, the path becomes linear again, and you’ll reach a giant cave with many Goblins.
In the Shadow of the Mine Cavern Puzzle Solution
After you clear the area of Goblins, you’ll be asked to investigate the cavern and solve another puzzle. The first thing you’ll want to do is find the crate behind the spider web on the southwestern wall. Burn the web with Incendio, cast Wingardium Leviosa on the box, and bring it to the smaller northwestern wall (pictured).

Climb on it and burn the spider web in front of the seal using Incendio, then head back to the ground floor and burn the web in front of the large door. The door is under the seal marked above. Finally, cast Revelio and look around to spot the three Seals you’ll have to hit with your Basic Cast (R2/RT). Make sure you do it in quick succession.
After opening the door, follow the passage behind, and you’ll reach a small cave that Isidora Morganach used in the past. Inside the chamber, there are two items of interest you’ll want to collect. The first is the Second Triptych Canvas Piece in the Treasure Chest, marked below.

The second one is Isidora’s Journal Entry (the third) found on the table in the middle of the chamber (also marked above). Read Isidora’s Journal Entry carefully because it reveals what happened to her after the memory you saw in the Pensieve inside Charles Rookwood’s Trial.
After finding the two items above, head back to Sebastian, so you two can share your thoughts. You’ll end up with more questions than answers, but at least now you can return to Undercroft via the glass wall in the chamber. Once you return to Undercroft, interact with the Triptych (large frame) on the wall to place the portrait or the Canvas Piece you found in the chest.
When talking to Sebastian one last time, he’ll tell you that he knows the place on the canvas and will ask you if you should visit it immediately. Unfortunately, Sebastian must wait because you’ll have to talk to Lodgok first and see if his plan to give Ranrok the Helm Of Urtkot worked.
When Sebastian asks you who you want to talk to, if you tell him about Lodgok, he’ll be upset because you decided to work with Goblins since they cursed his sister. If you choose not to tell, Sebastian will still learn about Lodgok. So, regardless of your choice, he’ll know, and your decision won’t affect the story and the subsequent events. By finishing Hogwarts Legacy In The Shadow Of The Mine, you’ll unlock multiple side-quests you can complete before starting the next main quest named It’s All Gobbledegook.
Sebastian’s In The Shadow Of Time Relationship Quest and Poppy’s Poached Egg Quest also unlock now, alongside Natty’s A Basis For Blackmail and All’s Well That Ends Bell side-quest.
